Bike disc brakes are a modern braking system that uses a caliper to squeeze pads against a metal rotor attached to the wheel hub, delivering powerful and consistent stopping performance. Originating from motorcycle technology and first introduced to mountain bikes in the 1990s—by innovators in the U.S., Germany, and Taiwan, China — disc brakes have since become the standard in off-road, gravel, and high-performance road cycling due to their superior modulation, all-weather reliability, and compatibility with wider tires and thru-axle frames. Unlike rim brakes, which act on the wheel’s surface, disc brakes isolate braking to the rotor, reducing rim wear and heat transfer. This article explores the definition, pros and cons, different types, and how to choose and adjust bike disc brakes to meet your specific riding needs.
This article explains what bike disc brakes are, highlights their advantages and disadvantages, explores the main types, and guides you on how to choose and adjust them for different riding conditions.
Table of Contents
What are disc brakes on a bike?
Disc brakes on a bike are a braking system where calipers squeeze brake pads against a rotor (disc) mounted to the hub, providing a powerful, consistent stopping force independent of rim conditions. First adopted from motorcycle technology and applied to mountain bikes in the 1990s—by brands like Hayes (USA) and Magura (Germany)—disc brakes have evolved from heavy, cable-actuated systems into lightweight, precise hydraulic setups now standard on mountain, gravel, and performance road bikes; today they feature larger rotors, flat mounts, and electronic integration, and their future promises even greater modulation, lighter materials, and widespread adoption across nearly all bike categories.
How do disc brakes work on a bike?
Disc brakes work by using a brake lever to activate a mechanical cable or hydraulic fluid, which forces brake caliper pistons to press pads against a rotor attached to the wheel hub, creating friction that slows or stops the bike. This system involves key components such as the brake lever, hose or cable, caliper, pistons, pads, and rotor—and is highly efficient because it offers powerful, consistent braking performance, excellent heat dissipation, and reliable stopping power in all weather and terrain conditions.
How do mechanical disc brakes work on a bike?
Mechanical disc brakes work by pulling a steel brake cable when the lever is squeezed, which actuates one or both pistons inside the brake caliper, pushing the brake pads against the rotor mounted on the wheel hub. This cable-actuated system is simpler and easier to maintain than hydraulic brakes, offering decent stopping power and value for casual riders, though it provides less modulation and can require more frequent adjustments due to cable stretch and pad wear.
How do hydraulic disc brakes work on a bike?
Hydraulic disc brakes work by transferring force from the brake lever through a sealed hydraulic hose filled with brake fluid (mineral oil or DOT), which pushes pistons in the caliper to press both pads evenly onto the rotor. This system delivers superior braking efficiency, smooth modulation, and consistent power in all conditions—ideal for mountain, gravel, and performance road bikes—though it is more complex and requires periodic bleeding and fluid maintenance.
What are the advantages of bike disc brakes?
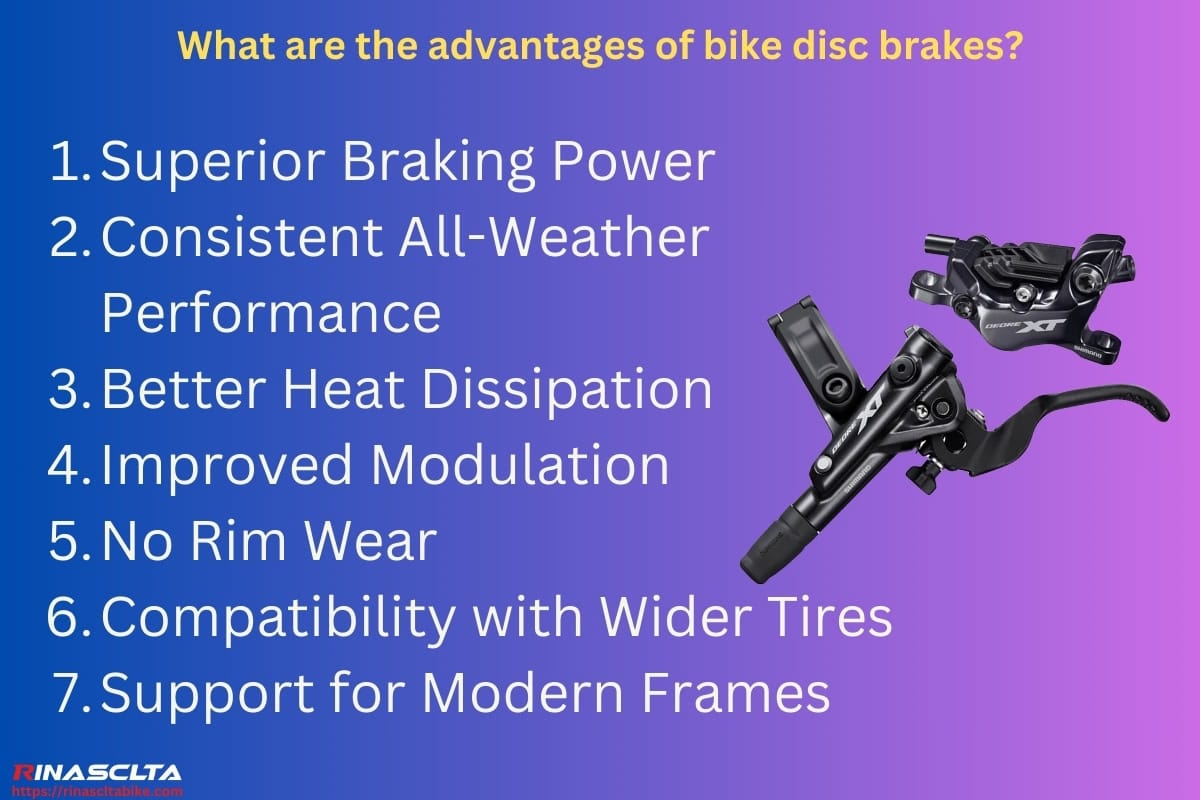
The advantages of bike disc brakes include superior stopping power, consistent all-weather performance, better heat dissipation, improved modulation, no rim wear, compatibility with wider tires, and support for modern frame standards—making them ideal for mountain biking, gravel, commuting, and high-performance road cycling. These features improve control, safety, and durability across various terrains and conditions, offering long-term value for both casual and serious riders.
- Superior Stopping Power: The advantages of disc brakes include greater braking force, especially important for downhill riding, heavy bikes, or emergency stops.
- Consistent All-Weather Performance: The advantages of disc brakes extend to reliable braking in rain, mud, or snow, as the rotor remains cleaner and less affected by contamination than rim surfaces.
- Better Heat Dissipation: The advantages of disc brakes involve isolated braking on the rotor, which disperses heat more effectively and reduces the risk of brake fade on long descents.
- Improved Modulation: The advantages of disc brakes offer smoother control over braking pressure, allowing you to feather or apply gradual stopping force more precisely.
- No Rim Wear: The advantages of disc brakes help preserve the wheel’s lifespan, since the braking surface is the rotor, not the rim, avoiding long-term rim degradation.
- Compatibility with Wider Tires: The advantages of disc brakes support wider tire clearance and frame designs, essential for gravel, touring, and modern road bikes.
- Support for Modern Frames: The advantages of disc brakes align with current standards like thru-axles and flat mounts, improving stiffness, alignment, and braking accuracy.
What are the disadvantages of bike disc brakes?
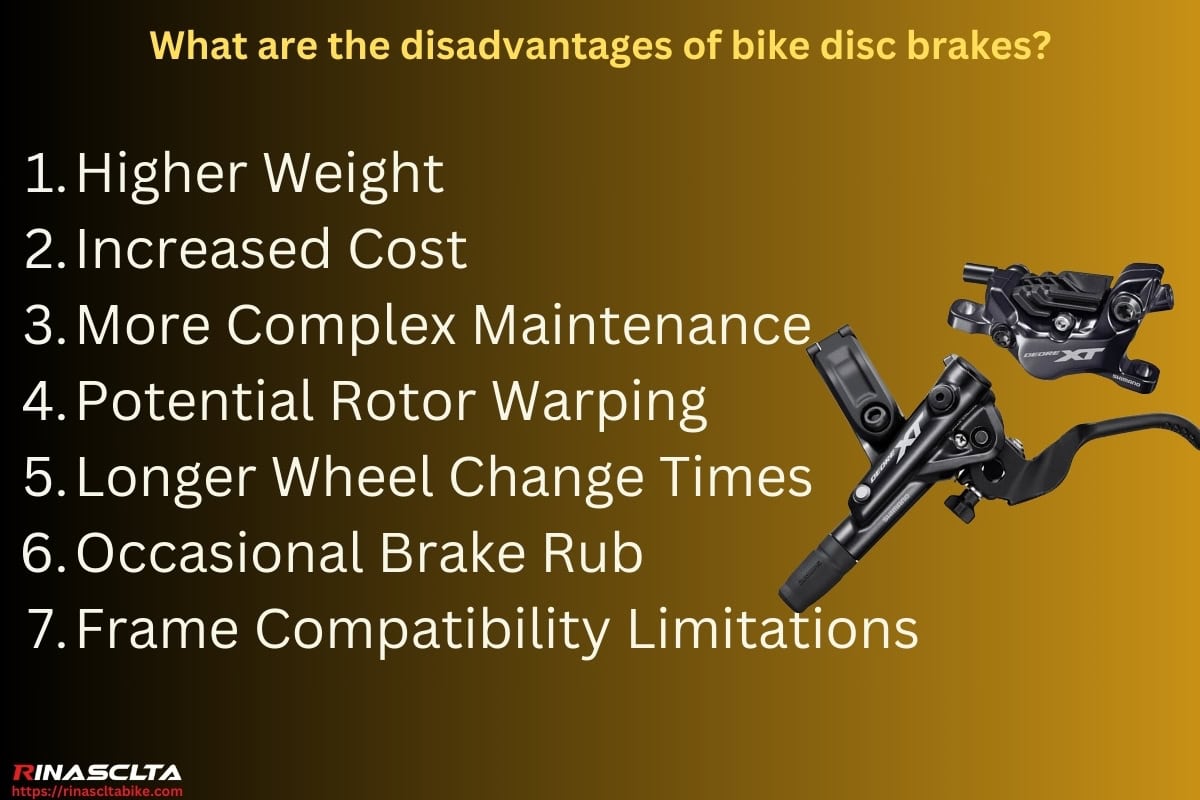
The disadvantages of bike disc brakes include higher weight, increased cost, more complex maintenance, potential rotor warping, longer wheel change times, occasional brake rub, and frame compatibility limitations—factors that can affect affordability, ease of use, and upgrade flexibility, especially for casual or weight-conscious riders. These trade-offs are important when choosing the right braking system based on your bike type, riding goals, and maintenance skills.
- Higher Weight: The disadvantages of disc brakes include added grams from rotors, calipers, and mounts, which can be a concern for climbers and competitive road cyclists aiming to minimize total bike weight.
- Increased Cost: The disadvantages of disc brakes involve more expensive components, installation, and service compared to traditional rim brakes, especially for hydraulic systems.
- More Complex Maintenance: The disadvantages of disc brakes include the need for specialized tools and skills, such as bleeding hydraulic lines or aligning calipers precisely to avoid performance issues.
- Potential Rotor Warping: The disadvantages of disc brakes include rotors bending from heat or impact, which can cause inconsistent braking, rubbing, or noise unless trued or replaced.
- Longer Wheel Change Times: The disadvantages of disc brakes affect speed during repairs or races, as wheel removal with thru-axles and tight rotor fit is slower than quick-release rim brake setups.
- Occasional Brake Rub: The disadvantages of disc brakes include minor pad or rotor misalignments that cause constant rubbing, which can reduce efficiency and be hard to troubleshoot for beginners.
- Frame Compatibility Limitations: The disadvantages of disc brakes require specific frame and fork mounts (flat or post mount) and reinforced designs, making them incompatible with many older or rim-brake-specific bikes.
What are bike disc brakes made of?
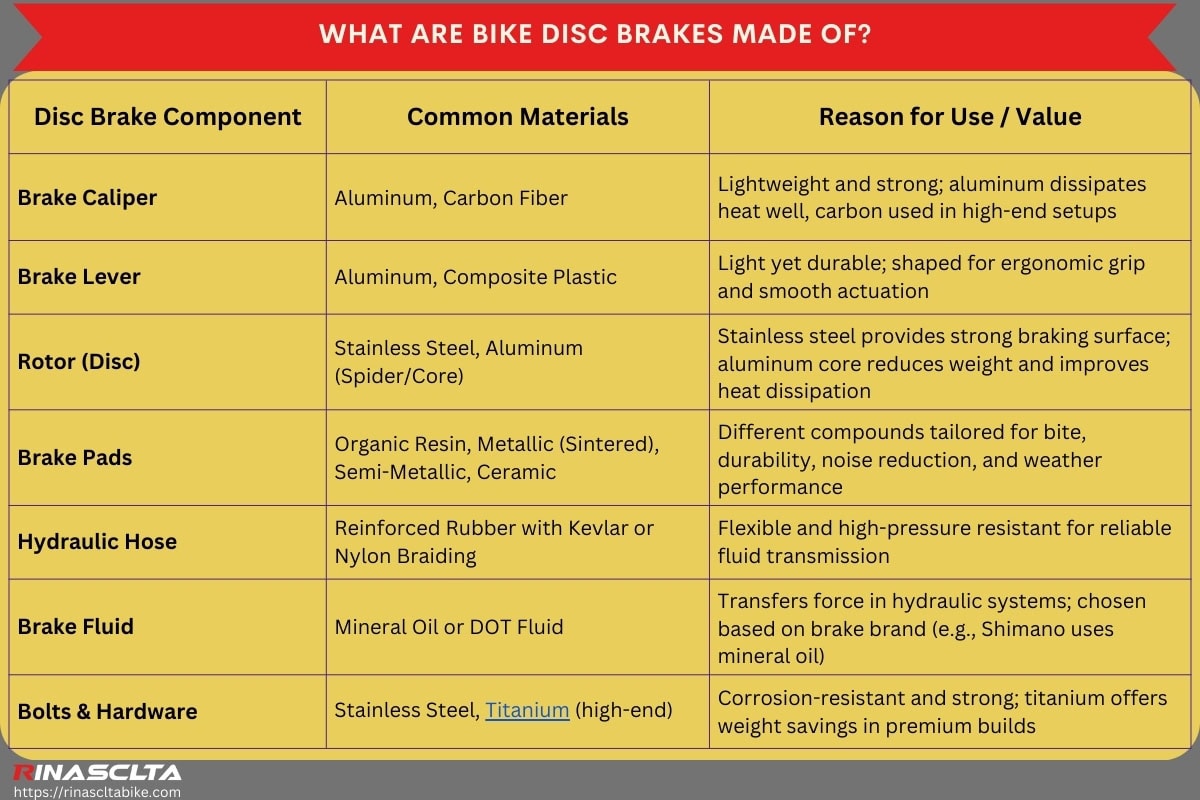
Bike disc brakes are made of materials such as aluminum, steel, stainless steel, carbon fiber, ceramic, composite resin, and rubber—each selected for its balance of strength, heat resistance, weight, durability, and braking efficiency. These materials are used across the calipers, rotors, pads, and levers to optimize performance under various riding conditions, from road cycling to aggressive downhill mountain biking.
| Disc Brake Component | Common Materials | Reason for Use / Value |
| Brake Caliper | Aluminum, Carbon Fiber | Lightweight and strong; aluminum dissipates heat well, carbon used in high-end setups |
| Brake Lever | Aluminum, Composite Plastic | Light yet durable; shaped for ergonomic grip and smooth actuation |
| Rotor (Disc) | Stainless Steel, Aluminum (Spider/Core) | Stainless steel provides strong braking surface; aluminum core reduces weight and improves heat dissipation |
| Brake Pads | Organic Resin, Metallic (Sintered), Semi-Metallic, Ceramic | Different compounds tailored for bite, durability, noise reduction, and weather performance |
| Hydraulic Hose | Reinforced Rubber with Kevlar or Nylon Braiding | Flexible and high-pressure resistant for reliable fluid transmission |
| Brake Fluid | Mineral Oil or DOT Fluid | Transfers force in hydraulic systems; chosen based on brake brand (e.g., Shimano uses mineral oil) |
| Bolts & Hardware | Stainless Steel, Titanium (high-end) | Corrosion-resistant and strong; titanium offers weight savings in premium builds |
What are bike disc brake pads made of?
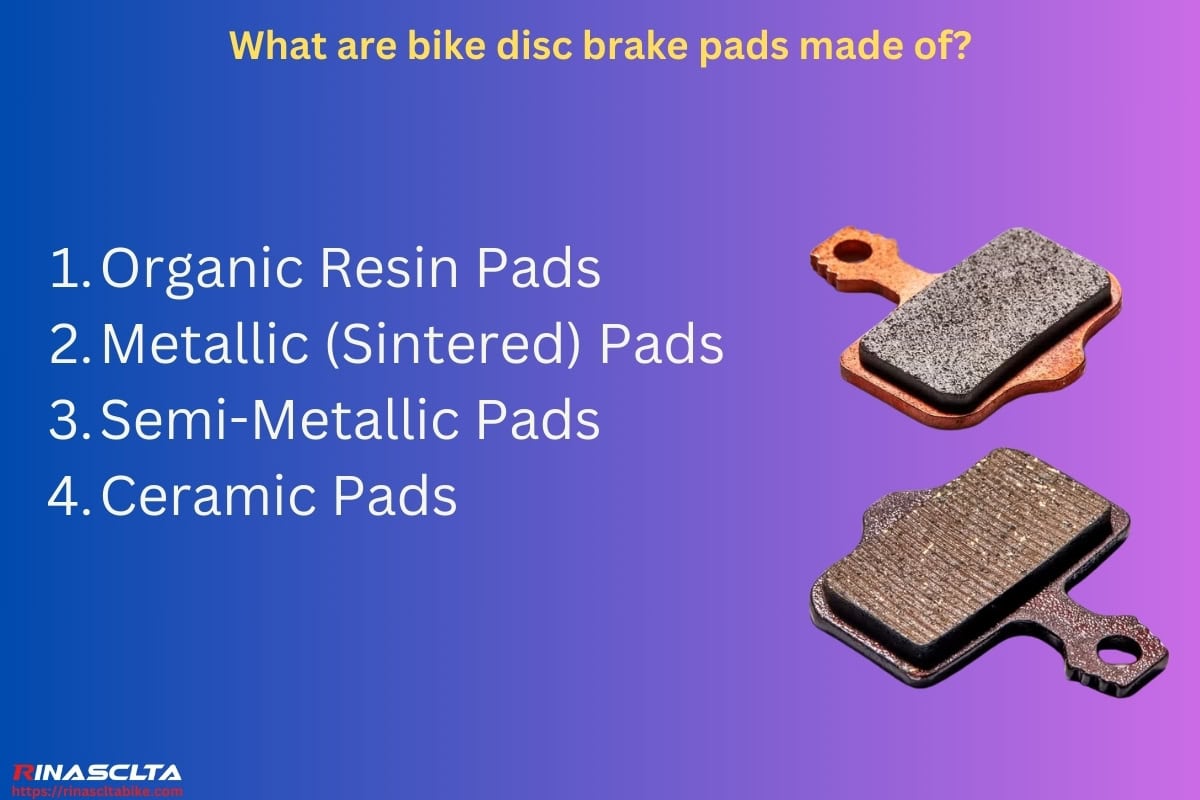
Bike disc brake pads are made of materials such as organic resin, metallic (sintered), semi-metallic compounds, and ceramic—each chosen for its balance of braking power, noise level, durability, and heat resistance across various riding conditions.
- Organic Resin Pads: Bike disc brake pads made of organic resin offer quiet operation and good initial bite, ideal for dry conditions and lighter bikes but wear faster and fade under heat.
- Metallic (Sintered) Pads: Bike disc brake pads made of metallic compounds are highly durable, heat-tolerant, and perform well in wet or muddy conditions, but they can be noisier and wear rotors faster.
- Semi-Metallic Pads: Bike disc brake pads made of semi-metallic blends balance durability and noise control, offering good performance across mixed terrain and temperatures.
- Ceramic Pads: Bike disc brake pads with ceramic content offer smooth braking and low noise with high heat resistance, commonly found in high-performance or long-descending setups.
Resin vs. Sintered Disc Brake Pads
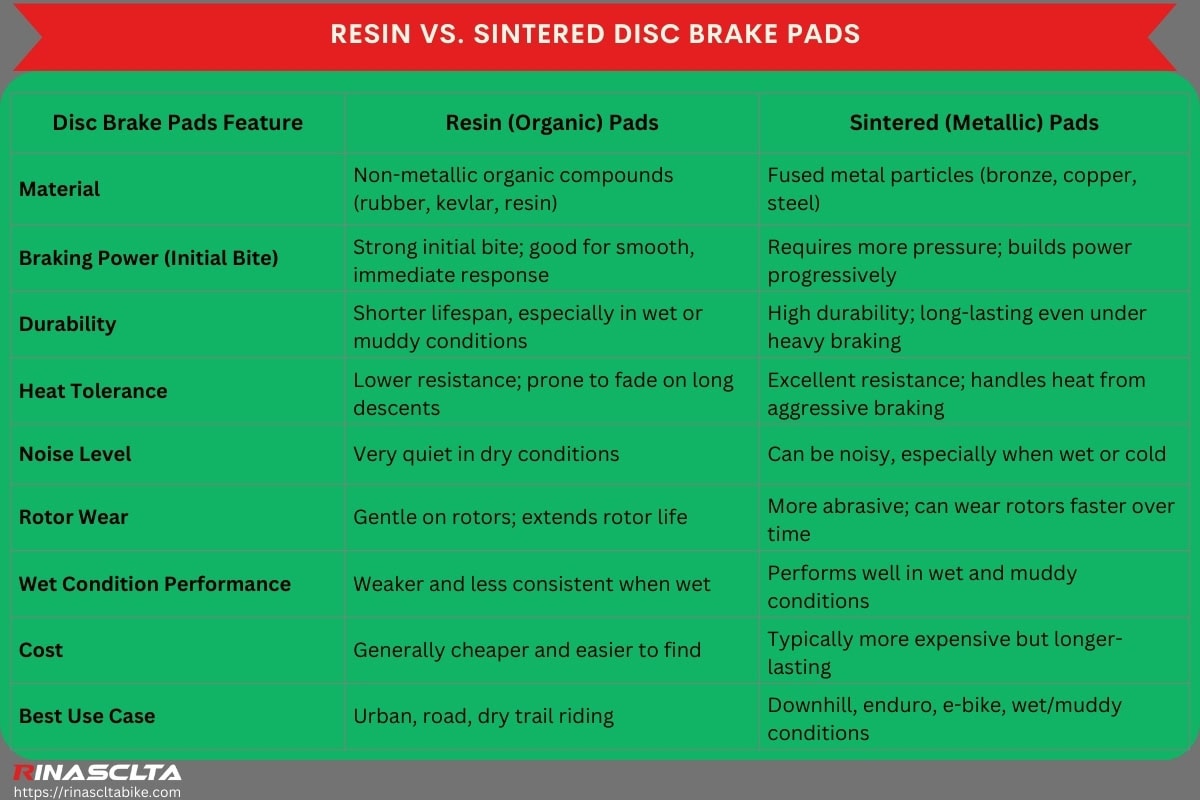
Resin vs. sintered disc brake pads is a common comparison because these two pad types use different materials that significantly affect braking performance, durability, heat resistance, and noise. Riders compare them to choose the most suitable option based on riding conditions (dry vs. wet), terrain (urban vs. mountain), and desired characteristics like smoothness, lifespan, or budget. Understanding their differences helps in optimizing safety, braking efficiency, and long-term value.
| Disc Brake Pads Feature | Resin (Organic) Pads | Sintered (Metallic) Pads |
| Material | Non-metallic organic compounds (rubber, kevlar, resin) | Fused metal particles (bronze, copper, steel) |
| Braking Power (Initial Bite) | Strong initial bite; good for smooth, immediate response | Requires more pressure; builds power progressively |
| Durability | Shorter lifespan, especially in wet or muddy conditions | High durability; long-lasting even under heavy braking |
| Heat Tolerance | Lower resistance; prone to fade on long descents | Excellent resistance; handles heat from aggressive braking |
| Noise Level | Very quiet in dry conditions | Can be noisy, especially when wet or cold |
| Rotor Wear | Gentle on rotors; extends rotor life | More abrasive; can wear rotors faster over time |
| Wet Condition Performance | Weaker and less consistent when wet | Performs well in wet and muddy conditions |
| Cost | Generally cheaper and easier to find | Typically more expensive but longer-lasting |
| Best Use Case | Urban, road, dry trail riding | Downhill, enduro, e-bike, wet/muddy conditions |
What are bike disc brake rotors made of?
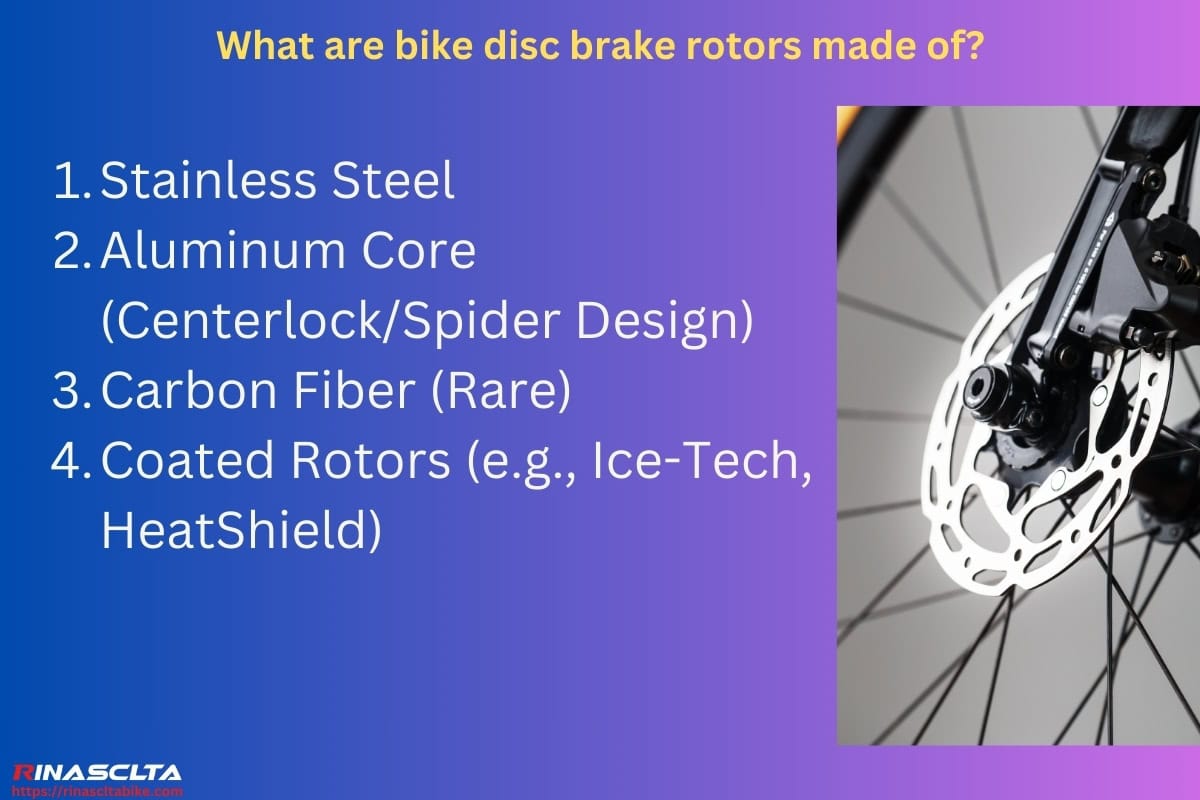
Bike disc brake rotors are made of materials such as stainless steel, aluminum (in rotor cores or spiders), carbon fiber (in rare high-end systems), and sometimes heat-dissipating coatings—selected for strength, thermal stability, weight, and braking consistency.
- Stainless Steel: Bike disc brake rotors made of stainless steel are the most common, offering reliable friction, corrosion resistance, and consistent performance across all weather conditions.
- Aluminum Core (Centerlock/Spider Design): Bike disc brake rotors with aluminum centers reduce weight and improve heat dissipation by separating the braking surface from the structural hub-mounting portion.
- Carbon Fiber (Rare): Bike disc brake rotors made of carbon fiber are ultralight and highly heat-resistant but expensive and typically reserved for professional racing.
- Coated Rotors (e.g., Ice-Tech, HeatShield): Bike disc brake rotors with ceramic or special coatings improve thermal management and reduce brake fade, often found on high-end MTB or road disc setups.
Can you fit disc brakes to any bike?
No, you cannot fit disc brakes to any bike because disc brakes require specific frame and fork mounts (like post mount or flat mount), disc-compatible hubs, and often thru-axles or reinforced dropouts to handle braking forces. Installing disc brakes on a rim-brake-only frame would require major modifications or replacement parts, making it impractical and unsafe.
Are mountain bike disc brakes universal?
No, mountain bike disc brakes are not fully universal because different models use varying rotor sizes (160–203 mm), mounting standards (post mount vs IS), and caliper compatibility (2-piston vs 4-piston). However, many MTB disc systems follow common standards, so cross-compatibility is possible within the same brand or with adapters.
Are road bike disc brakes universal?
No, road bike disc brakes are not universal because they use specific standards like flat mount calipers, narrow rotor sizes (140–160 mm), and brake lever compatibility with integrated shifters (STI). Differences in axle type, hose routing, and brand-specific systems (e.g., Shimano vs SRAM) also affect interchangeability.
Bike disc brakes diagram
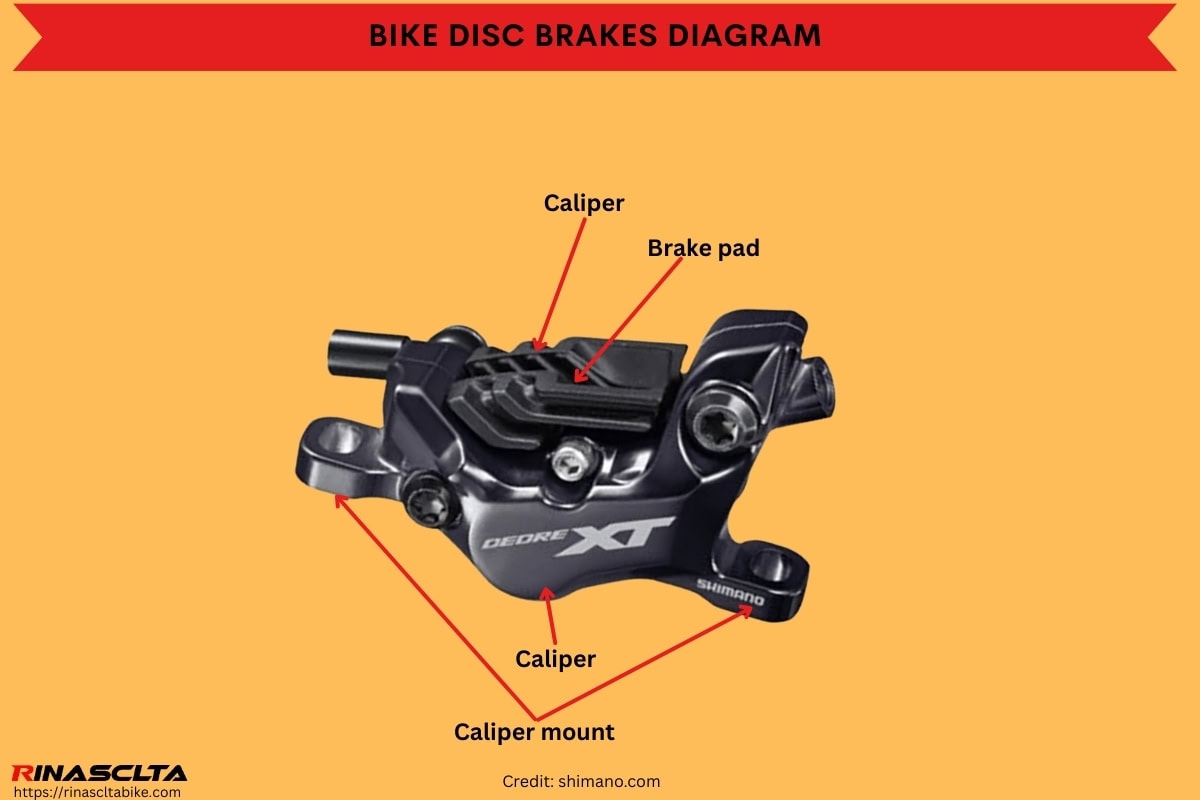
Bike disc brakes diagram is useful for understanding how the key components—such as the brake lever, hose or cable, caliper, pads, and rotor—work together to deliver controlled braking through hydraulic or mechanical force. Knowing the layout helps with installation, troubleshooting, and maintenance, especially for adjusting caliper alignment, replacing pads, or bleeding hydraulic lines.
What are the types of bike disc brake pads?
The bike disc brake pad types include organic (resin), metallic (sintered), semi-metallic, and ceramic pads—sorted by their compound material, which affects braking power, noise level, heat resistance, and durability. This classification helps riders choose the right pad type based on riding style, terrain, weather conditions, and rotor compatibility.
- Organic (Resin) Pads: The bike organic pads are made from non-metallic fibers bonded with resin, offering quiet braking, low rotor wear, and strong initial bite in dry conditions, but they wear faster and perform poorly in wet or muddy terrain.
- Metallic (Sintered) Pads: The bike metallic pads are made from hardened metal particles fused together, delivering the best durability and heat resistance, making them ideal for downhill, wet weather, and heavy-duty braking—but they are noisier and can wear rotors more quickly.
- Semi-Metallic Pads: The bike semi-metallic pads blend metal and resin compounds to balance performance, noise control, and pad life, making them a versatile choice for all-around riding across mixed conditions.
- Ceramic Pads: The bike ceramic pads incorporate ceramic particles for smoother braking, excellent heat management, and minimal noise, often used in high-performance or long-descent setups, though they are typically more expensive.
Are bike disc brake pads universal?
No, bike disc brake pads are not universal because different brake systems—such as Shimano, SRAM, Magura, Tektro, and TRP—use unique caliper shapes, pad sizes, backing plates, and retention mechanisms. Even within the same brand, various models (e.g., 2-piston vs 4-piston calipers) require specific pad designs, so using the wrong type can lead to poor fit, weak braking, or noise.
Bike disc brake bolt size
Bike disc brake bolt size for mounting rotors is typically T25 Torx bolts with M5 threads, and the standard length is usually 10 mm. These M5 x 0.8 mm pitch bolts are used in 6-bolt rotor systems, chosen for their strength, vibration resistance, and compatibility with common hub designs. For flat mount calipers, common bolt sizes are M5 x 18–25 mm, depending on frame thickness and adapter use. Always use manufacturer-recommended torque values (typically 4–6 Nm) and thread-locker to prevent loosening during riding.
Bike disc brake rotor size
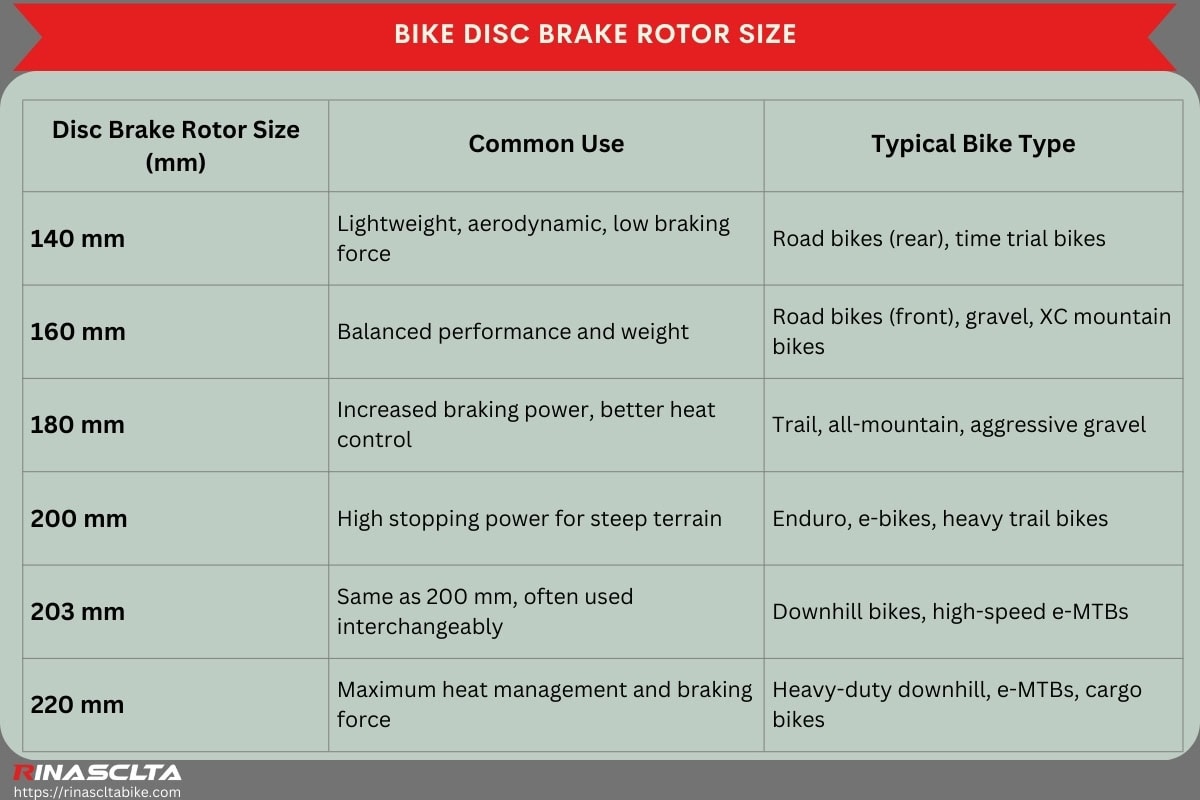
Bike disc brake rotor sizes commonly include 140 mm, 160 mm, 180 mm, 200 mm, and 203 mm, with some downhill or e-MTB rotors extending up to 220 mm—these sizes exist to balance weight, heat dissipation, and braking power across different bike types, riding styles, and terrains. Smaller rotors are lighter and more aerodynamic, ideal for road bikes, while larger rotors offer more stopping force and heat management, essential for mountain biking, e-bikes, and heavy loads.
| Disc Brake Rotor Size (mm) | Common Use | Typical Bike Type |
| 140 mm | Lightweight, aerodynamic, low braking force | Road bikes (rear), time trial bikes |
| 160 mm | Balanced performance and weight | Road bikes (front), gravel, XC mountain bikes |
| 180 mm | Increased braking power, better heat control | Trail, all-mountain, aggressive gravel |
| 200 mm | High stopping power for steep terrain | Enduro, e-bikes, heavy trail bikes |
| 203 mm | Same as 200 mm, often used interchangeably | Downhill bikes, high-speed e-MTBs |
| 220 mm | Maximum heat management and braking force | Heavy-duty downhill, e-MTBs, cargo bikes |
Bike disc brake caliper types
Bike disc brake caliper types include two-piston (twin piston) and four-piston calipers, which are sorted based on the number of pistons inside the caliper that press the pads against the rotor—this classification affects braking power, modulation, weight, and heat control across different riding disciplines.
- Two-Piston Caliper: A two-piston caliper uses one piston on each side of the rotor, offering lightweight construction and smooth braking, ideal for road, gravel, XC, and general-purpose trail riding.
- Four-Piston Caliper: A four-piston caliper uses two pistons per side for more braking force and better heat distribution, making it perfect for aggressive mountain biking, enduro, e-MTBs, and downhill use.
Types of bike disc brakes
The types of bike disc brakes include mechanical disc brakes and hydraulic disc brakes, sorted by the braking mechanism used to transfer force from the lever to the caliper—either via a cable or hydraulic fluid. This classification helps riders choose based on performance needs, maintenance preferences, and terrain demands. Bike disc brakes can also be categorized by bike types such as road, mountain, gravel, cyclocross, and BMX, reflecting their intended use and required braking power. Additionally, bike disc brakes are sorted by brake position—front and rear—based on where braking force is applied and how it’s distributed for balance and control.
Bike disc brakes sorted by brake mechanism
Bike disc brakes sorted by brake mechanism include mechanical and hydraulic types, categorized by how the braking force is transmitted from the lever to the caliper—either through a cable or hydraulic fluid. This distinction is important because it influences braking power, modulation, maintenance complexity, and overall performance value for different riding styles.
- Bike Mechanical Disc Brakes: Bike mechanical disc brakes use a steel cable to pull the caliper’s arm, which activates the pistons and pads against the rotor—offering simple setup, lower cost, and easy adjustment, ideal for commuters and entry-level mountain or gravel bikes.
- Bike Hydraulic Disc Brakes: Bike hydraulic disc brakes use sealed hoses filled with fluid (DOT or mineral oil) to press pistons against the rotor, delivering stronger stopping power, smoother modulation, and better heat management—preferred for high-performance road, mountain, and e-bikes.
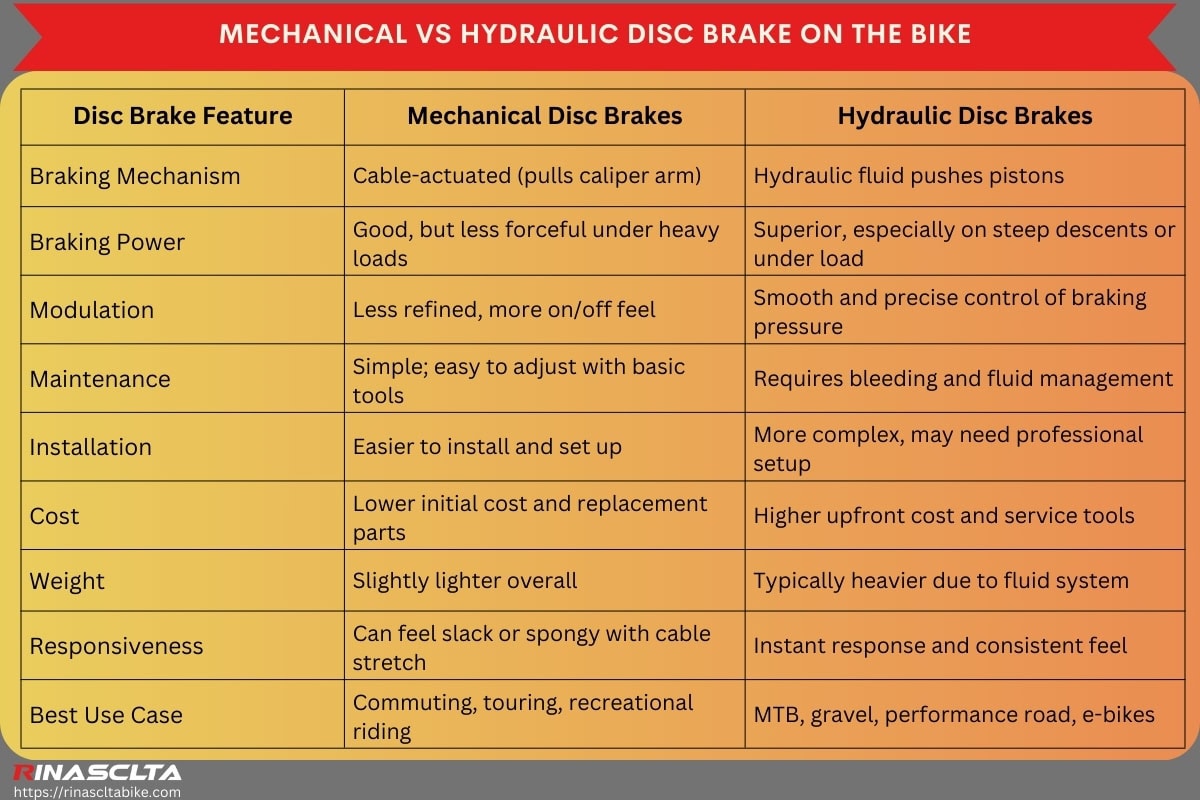
Mechanical vs hydraulic disc brake on the bike
Mechanical vs hydraulic disc brake on the bike is a common comparison because both systems use rotors and calipers but differ in how braking force is transmitted—mechanical through cables, hydraulic through fluid. Riders often struggle to decide between them because each offers unique advantages in terms of cost, performance, and maintenance, and the right choice depends on riding style, terrain, and how much time or money one wants to invest in upkeep. Understanding their differences helps cyclists choose the most suitable setup for commuting, touring, gravel, mountain, or performance road biking.
| Disc Brake Feature | Mechanical Disc Brakes | Hydraulic Disc Brakes |
| Braking Mechanism | Cable-actuated (pulls caliper arm) | Hydraulic fluid pushes pistons |
| Braking Power | Good, but less forceful under heavy loads | Superior, especially on steep descents or under load |
| Modulation | Less refined, more on/off feel | Smooth and precise control of braking pressure |
| Maintenance | Simple; easy to adjust with basic tools | Requires bleeding and fluid management |
| Installation | Easier to install and set up | More complex, may need professional setup |
| Cost | Lower initial cost and replacement parts | Higher upfront cost and service tools |
| Weight | Slightly lighter overall | Typically heavier due to fluid system |
| Responsiveness | Can feel slack or spongy with cable stretch | Instant response and consistent feel |
| Best Use Case | Commuting, touring, recreational riding | MTB, gravel, performance road, e-bikes |
Are all bike disc brakes hydraulic?
No, not all bike disc brakes are hydraulic because many bikes—especially entry-level, commuter, and touring models—use mechanical disc brakes, which operate through a traditional cable-actuated system instead of hydraulic fluid. Mechanical disc brakes are more affordable, easier to maintain, and compatible with standard brake levers, making them a practical choice for riders who prioritize simplicity and lower cost over maximum performance.
Bike disc brakes sorted by bike types
Bike disc brakes sorted by bike types include road, mountain, gravel, cyclocross, and BMX—each categorized based on the demands of the specific discipline, such as braking power, modulation, rotor size, weight, and frame compatibility. This classification helps match disc brake systems to different riding styles, terrains, and performance needs.
- Bike Road Disc Brakes: Bike road disc brakes prioritize lightweight design, compact calipers, and smaller rotors (140–160 mm) for precise modulation and aerodynamics on paved surfaces.
- Bike Mountain Disc Brakes: Bike mountain disc brakes use larger rotors (180–203 mm) and often feature 4-piston calipers to handle steep descents, technical trails, and rough terrain with maximum power and heat control.
- Bike Gravel Disc Brakes: Bike gravel disc brakes offer a balance of modulation and durability, typically with 160 mm rotors and mechanical or hydraulic systems optimized for mixed surfaces and long endurance rides.
- Bike Cyclocross Disc Brakes: Bike cyclocross disc brakes are built for rapid engagement, mud clearance, and consistent performance in harsh, wet conditions—commonly with 160 mm rotors and robust calipers.
- Bike BMX Disc Brakes: Bike BMX disc brakes (less common but growing) are compact and impact-resistant, designed for precise stopping in freestyle or park settings where frame clearance and durability are critical.
Mountain bike disc brake mount types
Mountain bike disc brake mount types include post mount, IS (International Standard) mount, and flat mount—each developed to match different caliper designs, frame/fork standards, and disc rotor sizes. These mounting types ensure proper caliper alignment, rotor clearance, and braking efficiency depending on the bike’s intended use and construction.
- Mountain Post Mount: The most common type for MTBs is the mountain post mount. It allows calipers to bolt directly into the fork or frame with minimal adapters and supports easy rotor size adjustments (e.g., 160, 180, 203 mm).
- Mountain IS Mount (International Standard): Mountain IS Mount uses sideways-facing bolt holes and typically requires adapters to fit modern calipers, offering compatibility with older mountain bike frames and forks.
- Mountain Flat Mount: Mountain flat mount, though rare on MTBs, is occasionally used on lightweight XC or gravel crossover frames, offering a compact, flush fit mainly for smaller rotors (140–160 mm) and cleaner aesthetics.
Road bike disc brake mount types
Road bike disc brake mount types include flat mount and post mount, each designed to match different caliper sizes, frame designs, and rotor standards, ensuring precise alignment, optimal brake performance, and compatibility with the aerodynamic and lightweight demands of road cycling.
- Road Flat Mount: The road flat mount is the modern standard on most road bikes. It offers a low-profile design that integrates cleanly with slender frames and is optimized for smaller rotors (140–160 mm), reducing weight and drag.
- Road Post Mount: Road post mount, though less common on current models, is sometimes found on gravel or endurance bikes and allows for easier caliper adjustments and compatibility with larger rotors for improved braking power.
Bike disc brakes sorted by brake position on the bike
Bike disc brakes sorted by brake position on the bike include front and rear disc brakes, categorized based on where the braking force is applied—this distinction is essential for optimizing weight distribution, stopping power, and braking control across different riding scenarios. Front and rear brakes often differ in rotor size, caliper configuration, and braking intensity to match the specific demands of each wheel.
- Bike Front Disc Brakes: Bike front disc brakes are mounted on the fork and typically provide the majority of stopping power (up to 70%), often using larger rotors (160–203 mm) and 4-piston calipers for strong, controlled deceleration.
- Bike Rear Disc Brakes: Bike rear disc brakes are mounted on the frame’s chainstay or seatstay and help maintain stability during braking, usually with slightly smaller rotors (140–180 mm) to avoid over-braking and rear-wheel lockup.
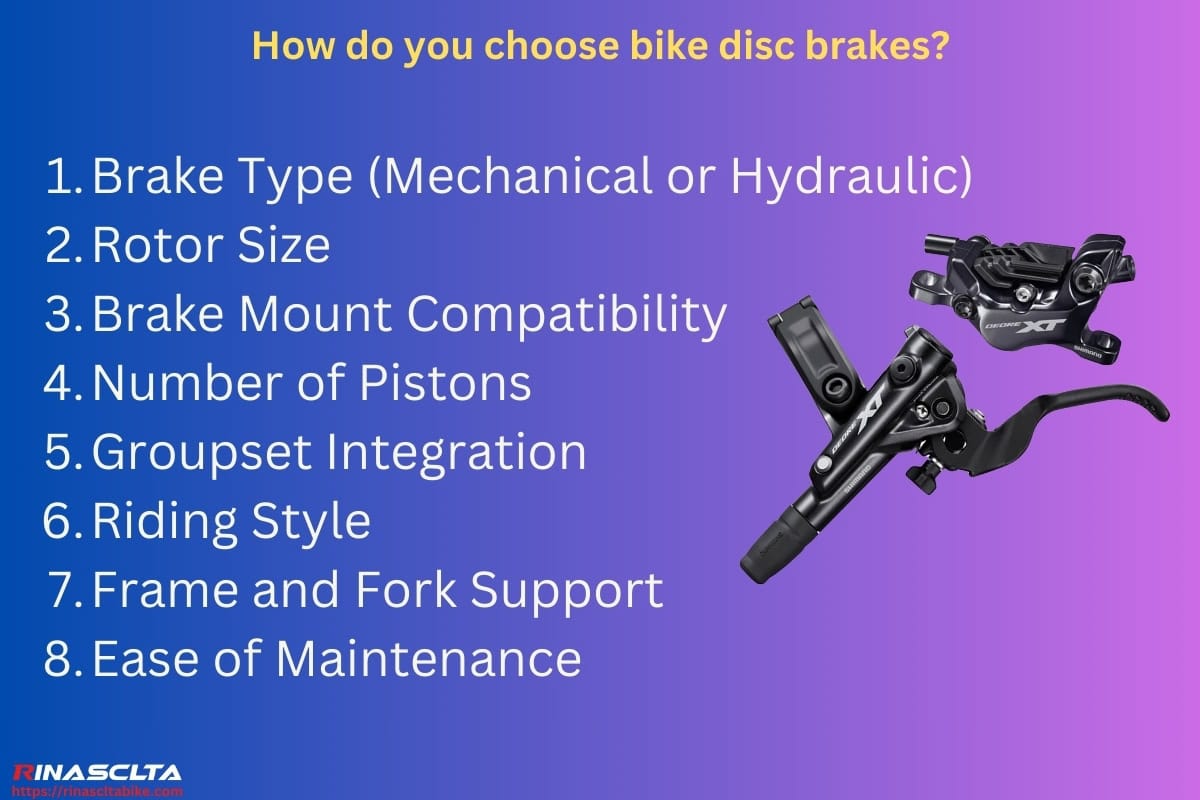
How do you choose bike disc brakes?
You can choose bike disc brakes by considering features such as brake type (mechanical or hydraulic), rotor size, brake mount compatibility, number of pistons, groupset integration, riding style, frame and fork support, ease of maintenance, and budget—each factor plays a critical role in overall performance, safety, and long-term value.
- Brake Type (Mechanical or Hydraulic): You can choose between mechanical disc brakes for simple, cable-based setups or hydraulic disc brakes for superior power and modulation with fluid-actuated systems.
- Rotor Size: You can select rotor size (140 mm to 220 mm) based on your riding needs—larger rotors provide better heat management and braking force for heavier bikes or steep descents.
- Brake Mount Compatibility: You can choose brakes that match your frame or fork’s mount type (flat mount, post mount, IS mount), ensuring proper fit and easy installation without unnecessary adapters.
- Number of Pistons: You can choose between 2-piston calipers for lightweight, moderate braking or 4-piston calipers for maximum power and heat dissipation in aggressive riding or downhill use.
- Groupset Integration: You can match disc brakes to your drivetrain groupset (e.g., Shimano GRX, SRAM Rival, or Campagnolo) for seamless shifting/braking lever compatibility and optimal performance.
- Riding Style: You can choose disc brakes based on whether you ride road, gravel, mountain, cyclocross, or touring—each discipline benefits from different brake setups in terms of power and modulation.
- Frame and Fork Support: You can check if your frame and fork are disc-compatible (with appropriate mounts and clearances), which is essential for a safe and functional disc brake system.
- Ease of Maintenance: You can consider mechanical disc brakes for easy cable adjustments or choose hydraulic systems if you’re comfortable bleeding brakes with tools like syringes and mineral/DOT fluid.
- Budget: You can select a brake system within your budget—mechanical systems start at lower price points, while high-end hydraulic models from Shimano, SRAM, or Magura cost more but offer superior performance.
How do you choose bike disc brake pads?
You can choose bike disc brake pads by considering your brake caliper model, riding conditions, and preferred pad compound—typically resin (organic), metallic (sintered), semi-metallic, or ceramic. Resin pads are quiet and work well in dry conditions, while metallic pads offer durability and superior wet-weather performance; always match the pad shape to your brake caliper (e.g., Shimano, SRAM, Magura), and consider factors like heat resistance, rotor wear, and bite point when selecting for commuting, MTB, or road use.
How do you choose bike disc brake rotors?
You can choose bike disc brake rotors by factoring in rotor size, mount type (6-bolt or center lock), and intended riding style, which directly impact braking force and heat dissipation. Larger rotors (180–203 mm) are better for aggressive or downhill riding due to better thermal control, while smaller ones (140–160 mm) are lighter and suitable for road or gravel bikes; also ensure compatibility with your hub, brake caliper, and frame/fork clearance to maintain proper function and safety.
How do you install disc brakes on a bike?
You can install disc brakes on a bike by following these key steps: mount the rotors, install the calipers, attach the levers, connect hoses or cables, align the calipers, set the rotor spacing, and bed in the pads—each step ensures the braking system functions safely and efficiently.
- Mount the Rotors: Align them with the hub’s bolt pattern (6-bolt or center lock) and tighten using a T25 Torx wrench or lockring tool to the recommended torque.
- Install the Calipers: Bolt them onto the fork or frame using the correct adapter (if required) based on your rotor size and mount type (post mount or flat mount).
- Attach the Levers: Slide brake levers onto the handlebars, position them for comfort and control, and tighten the clamp bolts securely.
- Connect Hoses or Cables: Route hydraulic hoses or mechanical cables from the levers to the calipers, cutting to length and securing with fittings, housing, or barbs as needed.
- Align the Calipers: Loosen the caliper bolts, squeeze the brake lever to center the caliper over the rotor, then tighten the bolts while holding the lever.
- Set the Rotor Spacing: Ensure the rotor spins freely between the pads; adjust using caliper position or barrel adjusters to eliminate rubbing.
- Bed in the Pads: Perform 10–20 controlled stops from moderate speed to evenly deposit pad material on the rotor and maximize braking performance.
How do you replace bike disc brake pads?
You can replace bike disc brake pads by first removing the wheel, opening the caliper (often by removing a retaining pin or bolt), and sliding out the worn pads using needle-nose pliers or a 3 mm Allen key, depending on your brake model. After pushing the pistons back into the caliper with a plastic tire lever or piston press, you can insert the new pads, secure them with the pad retention hardware, reinstall the wheel, and test for proper alignment and lever feel before riding.
Are special hubs required for a disc brake bike?
Yes, because disc brake bikes use hubs that are specifically designed to mount rotors—either with a 6-bolt pattern or a Center Lock spline interface—which standard rim brake hubs do not have. These disc-specific hubs also feature reinforced flanges and axle systems (like thru-axles) to handle the additional braking torque generated at the hub level.
Is it possible to install disc brakes on any bike?
Yes, but only if the frame and fork have disc brake mounts (post mount or flat mount) and enough clearance to accommodate rotors and calipers. Otherwise, retrofitting a rim brake frame for disc brakes would require major modifications or adapters, which often compromise safety, alignment, and performance—making it impractical for most setups.
How do you adjust bike disc brakes?
You can adjust bike disc brakes by aligning the brake caliper over the rotor and ensuring the pads don’t rub while maintaining responsive lever feel. This typically involves loosening the caliper mounting bolts, squeezing the brake lever to center the caliper, and re-tightening the bolts evenly—using a 5 mm Allen key and checking rotor clearance.
How do you adjust mechanical disc brakes on a bike?
You can adjust mechanical disc brakes by turning the barrel adjuster on the brake lever or caliper to fine-tune cable tension and pad distance, ensuring strong engagement without rotor rub. For deeper adjustment, use a 5 mm Allen key to reposition the inner pad or anchor the cable tighter at the caliper, making sure both pads are evenly spaced from the rotor.
How do you adjust hydraulic disc brakes on a bike?
You can adjust hydraulic disc brakes by centering the caliper over the rotor—loosen the caliper bolts, squeeze the brake lever to self-align the caliper, then tighten the bolts while holding the lever. If the lever feels too soft or spongy, you may need to bleed the brake system using a bleed kit and correct brake fluid (mineral oil or DOT), especially if air has entered the lines.
What do you put on a bike disc brake?
You put nothing lubricating on the rotor or pads—only isopropyl alcohol (90%+) or a bike-specific disc brake cleaner should be applied to clean the braking surfaces. Using grease, oil, or general cleaners can contaminate the pads and rotors, drastically reducing braking power and causing dangerous squealing or fade.
How do you tighten bike disc brakes?
You tighten bike disc brakes by adjusting the caliper position so that the pads engage the rotor sooner and more firmly. This can be done by loosening the caliper bolts, re-centering the caliper over the rotor, and tightening the bolts evenly while the lever is squeezed to ensure aligned, strong braking.
How do you tighten the bike disc brake cable?
You tighten the bike disc brake cable (for mechanical disc brakes) by loosening the cable anchor bolt at the caliper, pulling the cable tighter using pliers or your fingers, and re-securing the bolt with a 5 mm Allen key. Fine-tuning can be done using the barrel adjuster at the brake lever or caliper to achieve optimal tension and lever response.
How do you adjust the bike disc brake cable tension?
You adjust the bike disc brake cable tension by turning the barrel adjuster counterclockwise to increase tension or clockwise to reduce slack, improving pad engagement and lever feel. For larger changes, you can also reset the cable position at the anchor bolt on the caliper to ensure proper pad contact with the rotor.
How do you stop squeaky disc brakes on a bike?
You stop squeaky disc brakes by first cleaning the rotor and brake pads with isopropyl alcohol to remove dirt, glaze, or oil contamination. If the noise persists, you may need to lightly sand the pads and rotor, re-bed the brakes, or replace contaminated pads to restore quiet and effective braking performance.
Why does the bike disc brake squeal when not braking?
The bike disc brake squeals when not braking because the brake rotor is likely rubbing against one of the pads due to a misaligned caliper, warped rotor, or sticking piston, causing vibration and high-pitched noise even when you’re not pulling the lever.
Why is the bike disc brake squealing at low speed?
The bike disc brake is squealing at low speed because light pad contact combined with contamination (like oil, dirt, or brake cleaner overspray) creates surface resonance on the rotor, especially if the pads are glazed or the rotor is slightly out of true.
Why do the bike disc brakes have no stopping power?
The bike disc brakes have no stopping power because the pads or rotor may be contaminated, the pads are worn out, or there’s air in the hydraulic system—any of which severely reduces friction and prevents the system from applying full braking force.
Why the bike disc brakes won’t release?
The bike disc brakes won’t release because the caliper pistons are sticking, there’s too much fluid in the hydraulic system, or the mechanical cable is binding, causing the pads to stay pressed against the rotor and preventing the wheel from spinning freely.
How do you make bike disc brakes more responsive?
You can make bike disc brakes more responsive by first centering the caliper over the rotor to ensure both pads engage evenly, and then checking pad wear to replace them if they’re too thin or glazed. For mechanical systems, you can tighten the cable tension using the barrel adjuster or anchor bolt; for hydraulic brakes, bleed the system to remove air bubbles and restore full braking force—these steps improve lever feel, reduce travel, and maximize braking efficiency for better control and safety.
How do you clean disc brakes on a bike?
You can clean disc brakes on a bike by removing the wheel, cleaning the rotor, inspecting and cleaning the pads, drying all components, reinstalling the wheel, and bedding the brakes again—each step ensures restored braking power and eliminates noise or contamination.
- Remove the Wheel: You can remove the wheel to access the rotor and pads safely without contaminating other parts of the bike.
- Clean the Rotor: You can spray isopropyl alcohol (90% or higher) or a bike-specific disc brake cleaner on the rotor and wipe it thoroughly with a lint-free cloth or paper towel to remove grease, dirt, and brake dust.
- Inspect and Clean the Pads: You can remove the brake pads and lightly scuff them with sandpaper if glazed, then clean them with isopropyl alcohol to remove embedded grime or oil.
- Dry All Components: You can let the rotor and pads air dry or use a clean cloth—never use compressed air or heat, which can cause contamination or warping.
- Reinstall the Wheel: You can place the wheel back into the dropouts, making sure the rotor fits cleanly between the pads without rub.
- Bed the Brakes Again: You can perform 10–20 moderate stops from speed to re-bed the pads into the rotor for consistent and strong braking performance.
Can I use olive oil for bike disc brakes?
No, you cannot use olive oil for bike disc brakes because it is not a hydraulic fluid and lacks the boiling point, viscosity, and chemical stability required for safe and effective brake performance. Using olive oil in a hydraulic brake system (which is designed for mineral oil or DOT fluid, depending on the brand) will lead to seal damage, brake failure, and complete loss of stopping power, posing a serious safety risk.
When do you replace a bike disc brake?
You should replace a bike disc brake caliper or system when it shows signs of piston failure, fluid leakage, cracked housing, or persistent brake rub even after proper adjustment and bleeding. Typically, disc brake systems can last several years, but replacement is necessary if they no longer hold pressure, actuate properly, or respond to maintenance.
When to change bike disc brake pads?
You should change bike disc brake pads when the pad material wears down to 1 mm or less, or when the braking feels weak or noisy despite a clean rotor. On average, pads last between 500 to 2,000 km (300–1,200 miles) depending on riding style, weather conditions, and terrain.
How long do bike disc brakes last?
You can expect the entire bike disc brake system (including calipers, hoses, levers, and rotors) to last 3 to 5 years or more with regular maintenance. Longevity depends on usage intensity, environment (e.g., muddy or dusty), and proper care such as routine cleaning and timely pad replacement.
How long do disc brake pads last bike?
You can expect disc brake pads to last between 500 and 2,000 km (300–1,200 miles) depending on whether they are resin or sintered, and how often you brake, especially in steep or wet terrain. Riding in clean, dry conditions significantly extends their lifespan.
How long do mountain bike disc brake pads last?
You can expect mountain bike disc brake pads to last 500 to 1,500 km (300–900 miles), as off-road riding involves more braking, rough terrain, and muddy or wet conditions that accelerate wear. Frequent descents and aggressive braking shorten their life.
How long do road bike disc brake pads last?
You can expect road bike disc brake pads to last 1,000 to 2,500 km (600–1,500 miles), especially in dry, smooth terrain with fewer hard stops. Resin pads on road bikes may wear faster under heavy braking or prolonged descents.
How long do road bike disc brake rotors last?
You should replace road bike disc brake rotors every 15,000 to 20,000 km (9,000–12,000 miles) or sooner if they become scored, warped, or worn below the minimum thickness (usually marked on the rotor, e.g., 1.5 mm). Rotor wear can cause reduced braking power and vibration.
How often should bike disc brake pads be replaced?
You should replace bike disc brake pads every 500–2,000 km (300–1,200 miles) depending on terrain, weather, and braking frequency—or immediately if they’re contaminated, noisy, or worn below 1 mm. Regular inspection ensures reliable stopping power and rotor protection.
What is the cost of the bike disc brake replacement?
The cost of bike disc brake replacement typically ranges from USD 30–80 / EUR 30–75 / GBP 25–65 per brake (caliper, pads, and rotor), depending on the brand (e.g., Shimano, SRAM, Magura), type (mechanical or hydraulic), and quality level. Resin pads cost around USD 10–20, rotors about USD 15–40, and hydraulic calipers or levers can range from USD 25–60 each, making full replacement pricier for high-performance or dual-piston systems.
What is the cost of installing disc brakes on a bike?
The cost of installing disc brakes on a bike (retrofit) can range from USD 150–400 / EUR 140–370 / GBP 130–350, including parts and labor, if the frame and fork are already disc-compatible. If your bike is rim-brake-only, converting it to disc brakes may require replacing the frame, fork, wheels, and hubs, which can easily exceed USD 500–800—making it more cost-effective to buy a new disc-brake bike.
Do bike disc brakes need to break in?
No, bike disc brakes do not function at full power immediately because the pads and rotor need to go through a bedding-in process to transfer an even layer of pad material onto the rotor surface. But once properly bedded—by performing about 10–20 controlled stops from moderate speed—the brakes gain full friction, improved modulation, and consistent stopping power, reducing noise and uneven wear.
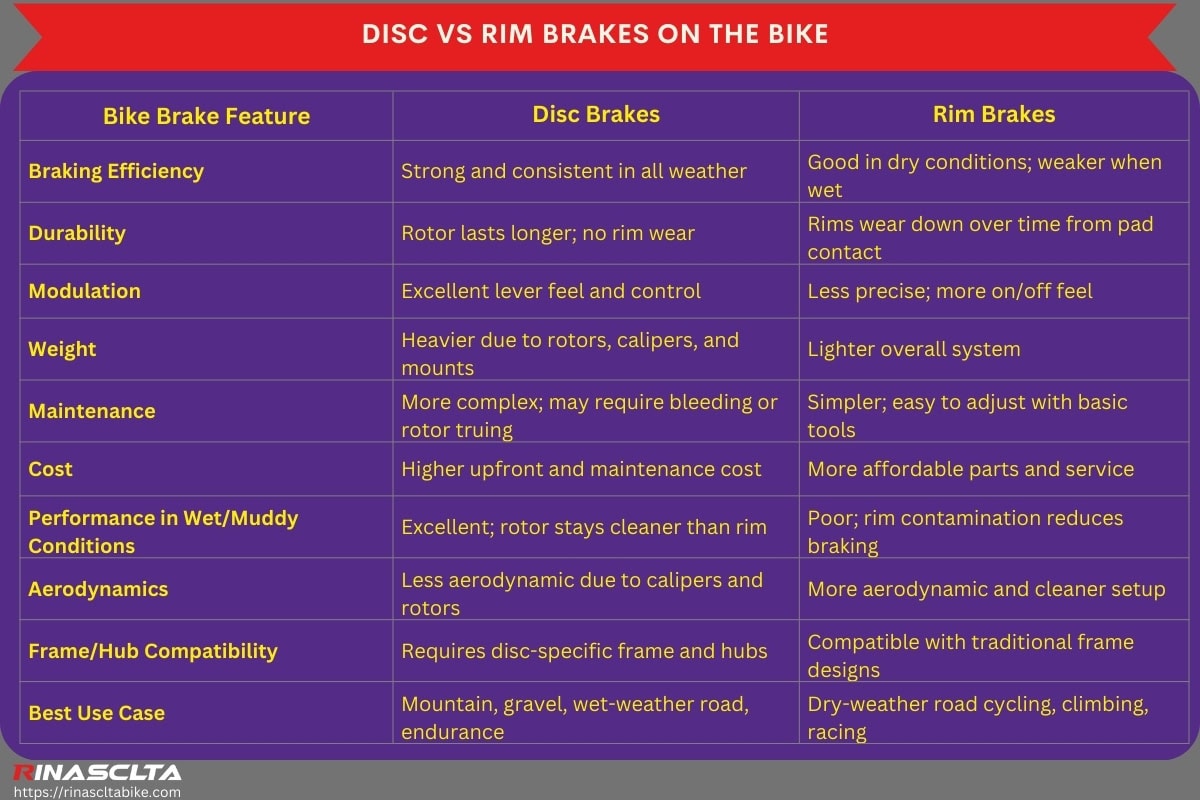
Disc vs rim brakes on the bike
Disc vs rim brakes on the bike is one of the most important comparisons in cycling because each braking system offers distinct performance, maintenance, and cost characteristics that affect the rider’s control, safety, and long-term bike value. Disc brakes apply force to a rotor at the hub and offer powerful, consistent braking in all conditions, while rim brakes apply force directly to the wheel rim and are lighter and easier to maintain. Riders compare them to choose the right system based on terrain, riding style, weather, budget, and bike type.
| Bike Brake Feature | Disc Brakes | Rim Brakes |
| Braking Efficiency | Strong and consistent in all weather | Good in dry conditions; weaker when wet |
| Durability | Rotor lasts longer; no rim wear | Rims wear down over time from pad contact |
| Modulation | Excellent lever feel and control | Less precise; more on/off feel |
| Weight | Heavier due to rotors, calipers, and mounts | Lighter overall system |
| Maintenance | More complex; may require bleeding or rotor truing | Simpler; easy to adjust with basic tools |
| Cost | Higher upfront and maintenance cost | More affordable parts and service |
| Performance in Wet/Muddy Conditions | Excellent; rotor stays cleaner than rim | Poor; rim contamination reduces braking |
| Aerodynamics | Less aerodynamic due to calipers and rotors | More aerodynamic and cleaner setup |
| Frame/Hub Compatibility | Requires disc-specific frame and hubs | Compatible with traditional frame designs |
| Best Use Case | Mountain, gravel, wet-weather road, endurance | Dry-weather road cycling, climbing, racing |
Are disc brakes better on a bike?
Yes, if you ride in varied terrain, wet conditions, or require powerful, consistent braking, disc brakes are better because they offer superior modulation and don’t wear the rim. But for dry-road use, weight savings, and simplicity, rim brakes are still a valid and lighter choice.
Are disc brakes better for road bikes?
Yes, if you value all-weather performance, better control on descents, and compatibility with wider tires, disc brakes are better for road bikes. But they add weight and complexity, so racers or climbers may still prefer rim brakes for minimalism and marginal gains.
Are disc brakes better on mountain bikes?
Yes, if you ride technical trails, steep descents, or in muddy/wet environments, disc brakes are far better on mountain bikes due to stronger braking force, heat resistance, and rotor clearance. But they require more maintenance and cost, especially hydraulic setups.
Can you convert a rim brake bike to disc brakes?
Yes, if the frame and fork are already disc-compatible with appropriate mounts and hub spacing. But if not, conversion is impractical or unsafe because rim-brake-only frames lack disc mounts, hub rotor interfaces, and structural reinforcement for disc braking forces.
Bike disc brake conversion kit
Bike disc brake conversion kit is a set of components designed to upgrade a rim-brake bike to disc brakes, typically including disc brake calipers, rotors, adapters, levers, cables or hoses, and sometimes wheels with disc-compatible hubs. Bike disc brake conversion kits work by replacing the rim brake system with a rotor-based setup to improve braking power and all-weather performance, but they are only effective if the bike frame and fork have disc mounts—otherwise, structural limitations make the conversion impractical or unsafe.
Mountain bike disc brake adapter
Bike mountain disc brake adapter is a small metal bracket used to mount a disc brake caliper to a frame or fork when the rotor size or mount standard doesn’t match directly. Bike mountain disc brake adapters work by spacing the caliper correctly over the rotor—typically converting between post mount and flat mount standards or accommodating larger rotors like 180 mm or 203 mm—allowing riders to upgrade or fine-tune braking performance without replacing the frame or fork.
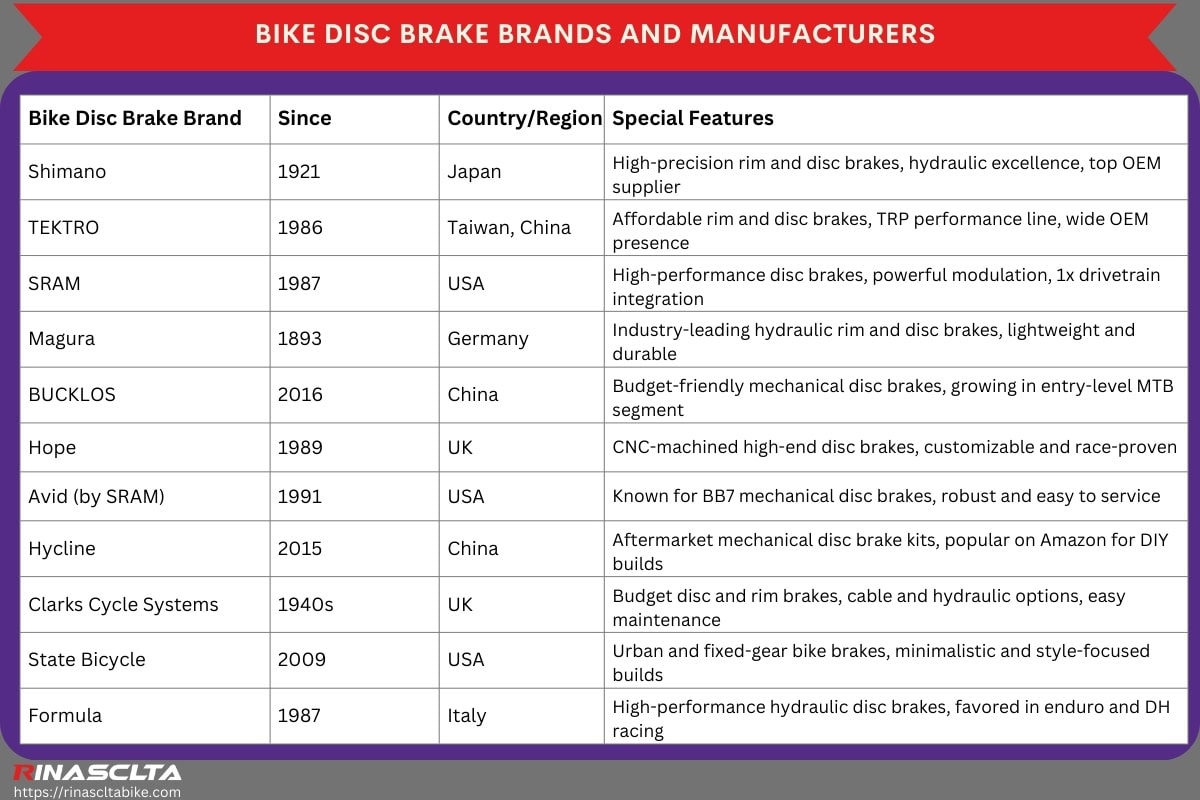
Bike disc brake brands and manufacturers
Bike disc brake brands and manufacturers have evolved over the decades alongside advancements in bicycle technology, responding to the demand for safer, lighter, and more efficient braking systems across disciplines like road, mountain, BMX, and urban cycling. From Japan’s precision engineering to Europe’s hydraulic innovation and newer global entrants offering affordable alternatives, these brands offer a range of braking solutions—including rim brakes, mechanical disc brakes, and high-performance hydraulic systems—tailored to different riding needs and budgets.
| Bike Disc Brake Brand | Since | Country/Region | Special Features |
| Shimano | 1921 | Japan | High-precision rim and disc brakes, hydraulic excellence, top OEM supplier |
| TEKTRO | 1986 | Taiwan, China | Affordable rim and disc brakes, TRP performance line, wide OEM presence |
| SRAM | 1987 | USA | High-performance disc brakes, powerful modulation, 1x drivetrain integration |
| Magura | 1893 | Germany | Industry-leading hydraulic rim and disc brakes, lightweight and durable |
| BUCKLOS | 2016 | China | Budget-friendly mechanical disc brakes, growing in entry-level MTB segment |
| Hope | 1989 | UK | CNC-machined high-end disc brakes, customizable and race-proven |
| Avid (by SRAM) | 1991 | USA | Known for BB7 mechanical disc brakes, robust and easy to service |
| Hycline | 2015 | China | Aftermarket mechanical disc brake kits, popular on Amazon for DIY builds |
| Clarks Cycle Systems | 1940s | UK | Budget disc and rim brakes, cable and hydraulic options, easy maintenance |
| State Bicycle | 2009 | USA | Urban and fixed-gear bike brakes, minimalistic and style-focused builds |
| Formula | 1987 | Italy | High-performance hydraulic disc brakes, favored in enduro and DH racing |
