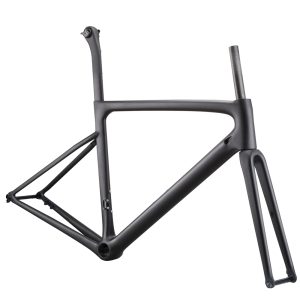
What is a bike handlebar?
A bike handlebar is a structural component of a bicycle that allows the rider to steer, control balance, and maintain a stable riding position. The first bike handlebars appeared in the late 1800s in Europe, with early versions made of simple, straight metal bars designed for basic steering functionality on the “safety bicycles” of the time. Brands like Raleigh in the UK popularized handlebars in the early 20th century as bikes became more accessible to the general public. Bike handlebars play a crucial role in determining rider comfort, handling precision, and bike control. They are used to steer, change direction, and provide support for different riding postures, making them essential for efficient riding across various cycling disciplines.
How do bike handlebars work?
Bike handlebars work by providing the rider with the ability to steer, control leverage, and maintain balance, which are essential functions for effective bike handling and performance. Handlebar theory explains how handlebars act as a lever, affecting leverage, comfort, and the ability to lift the front wheel. The handlebar’s width, shape, and positioning influence the bike’s geometry, impacting steering responsiveness, rider posture, and overall cycling performance. Proper handlebar selection ensures optimal comfort, leverage for control, and the lift required for technical maneuvers, enhancing both safety and efficiency on the bike.
How do mountain bike handlebars work?
Mountain bike handlebars work by providing stability and control over technical terrains. These handlebars are generally wide, typically ranging from 700mm to 800mm, which increases leverage, making it easier to navigate rough trails and maintain balance. They often have a rise and back sweep that puts the rider in an upright and relaxed position, which enhances comfort and control when navigating steep descents and tight corners. Wide handlebars offer more precise steering at lower speeds, which is crucial for technical maneuvers, while also allowing better weight distribution over the front wheel, contributing to improved grip and control.
How do road bike handlebars work?
Road bike handlebars work by allowing the rider to shift between different hand positions to optimize aerodynamics and comfort. Drop handlebars, commonly ranging from 380mm to 460mm, provide multiple grip options—on the tops, hoods, or drops—allowing the rider to adjust their position depending on the terrain or riding conditions. When riding in the drops, the rider can achieve a lower and more aerodynamic posture, reducing wind resistance and enhancing speed. Road bike handlebars also provide control during sprints, climbs, and descents, making them versatile for various aspects of road cycling. The narrower width helps maintain an efficient and streamlined position, essential for long-distance riding.
How do triathlon bike handlebars work?
Triathlon bike handlebars work by maximizing aerodynamics and efficiency in non-drafting race scenarios. Triathlon handlebars, also known as aero bars, feature extensions that allow the rider to adopt a forward-leaning position, which significantly reduces drag. These handlebars typically have elbow pads to support the rider’s forearms, providing comfort during long periods in the aerodynamic position. By reducing the rider’s frontal area, triathlon handlebars contribute to improved speed and reduced energy expenditure over long distances. The geometry of triathlon bikes, combined with aero handlebars, ensures an aggressive position that keeps the rider’s back flat and arms tucked, optimizing performance in time trials and triathlons.
Bike handlebar diagram
Below is the bike handlebar diagram with the essential part names.

Bike handlebar parts names
Bike handlebars are made up of several key parts, including the bar itself, stem, grips, brake levers, shifters, and bar ends, each playing a specific role in the function and control of the bike.
- Handlebar Bar: The main tube that provides the steering control and hand positioning, available in different shapes like flat, riser, or drop bars to suit different riding styles.
- Stem: Connects the handlebar to the steerer tube of the fork, determining handlebar height and reach, and thus affecting rider position and comfort.
- Grips: Fitted on either side of the handlebar to provide comfortable contact points for the rider’s hands, often made from rubber or foam to reduce vibration.
- Brake Levers: Mounted on the handlebar for easy access, allowing the rider to control braking with their fingers, ensuring safe stopping power.
- Shifters: Integrated into the handlebars to provide convenient gear changes, allowing the rider to adjust the drivetrain for efficient pedaling.
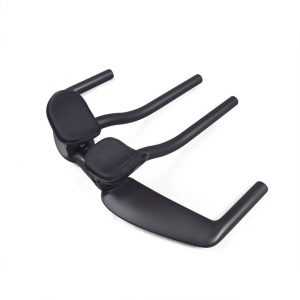
- Bar Ends: Optional extensions fitted to the ends of flat or riser bars to provide additional hand positions, commonly used in mountain biking for extra leverage during climbs.
Bike handlebar types
Bike handlebar types include flat bars, drop bars, riser bars, bullhorn bars, aero bars, and cruiser bars, which can be sorted based on cycling types, handlebar shape, bar top shape, and bar clamp diameter. This classification helps riders choose the best handlebar for their specific cycling needs—whether it’s for mountain biking, road racing, triathlon, or casual cruising. Sorting by handlebar shape and bar clamp diameter also ensures compatibility with different bikes and frames while optimizing comfort, control, and aerodynamics for the intended riding style.
Bike handlebars sorted by cycling types
Bike handlebars are sorted by cycling types such as road, triathlon, gravel, bikepacking, mountain, downhill, dirt, BMX, and touring. This categorization is based on the different requirements of each cycling discipline, including factors like rider position, control, handling, and comfort, which are optimized for the specific conditions of each type of riding.
- Road Bike Handlebars: Typically drop bars, designed for aerodynamics and multiple hand positions, allowing efficient posture for long-distance road riding.
- Triathlon Bike Handlebars: Aero bars that enable a forward-leaning aerodynamic position, reducing drag to improve speed during time trials and triathlons.
- Gravel Bike Handlebars: Flared drop bars that provide a combination of aerodynamics and control, suited for mixed terrain and gravel riding.
- Bikepacking Handlebars: Wide bars with multiple hand positions and space for mounting gear, offering comfort and stability for long-distance adventures.
- Mountain Bike Handlebars: Flat or riser bars that offer better control and leverage, essential for navigating technical terrain and handling obstacles.
- Downhill Bike Handlebars: Wide riser bars provide extra control and stability during high-speed descents and rough trails.
- Dirt Jump Bike Handlebars: Wide and sturdy bars that provide leverage and stability for executing jumps and tricks in dirt parks.
- BMX Bike Handlebars: High-rise bars designed for better leverage and control, ideal for stunts and tricks on BMX bikes.
- Touring Bike Handlebars: Butterfly or drop bars, designed for comfort with multiple hand positions to reduce fatigue during long-distance touring rides.
Bike handlebars sorted by handlebar shape
Bike handlebars are sorted by handlebar shape, including flat, riser, aero, drop, flare, integrated, upright, and cruiser bars. These types are sorted based on their shape and purpose, which determines their suitability for different cycling disciplines, rider positions, and control needs, from aerodynamic racing to relaxed cruising.
- Flat Handlebars: Straight bars that offer a natural hand position, providing excellent control and stability, commonly used in mountain biking and urban riding.
- Riser Handlebars: Bars that rise upward from the center, giving a more upright riding position for better comfort and control, popular in mountain biking.
- Aero Handlebars: Specialized bars designed for aerodynamics, allowing riders to lean forward in a time-trial or triathlon position to reduce drag.
- Drop Handlebars: Curved bars that offer multiple hand positions and are ideal for road cycling, providing both an aerodynamic posture and comfort for longer rides.
- Flare Handlebars: Drop bars with outward-angled drops, offering better control and stability on mixed terrains, commonly found on gravel bikes.
- Integrated Handlebars: Bars that combine the stem and handlebar in one piece, reducing weight and improving aerodynamics, often used in high-end road bikes.
- Upright Handlebars: High-rise bars that provide an upright riding position, prioritizing comfort and visibility, often found on commuter and comfort bikes.
- Cruiser Handlebars: Wide, swept-back bars that allow a relaxed, comfortable position, ideal for leisurely rides on cruiser bikes.
Bike handlebars sorted by top shape
Bike handlebars are sorted by top shape, including oversized, ergo, aero, and round bars. These types are categorized based on the cross-sectional shape of the handlebar top, which impacts aerodynamics, comfort, and hand placement, providing options that suit different cycling needs and preferences.
- Oversized Handlebars: Bars with a thicker cross-section, providing increased stiffness and durability, often used in road and mountain bikes for enhanced control.
- Ergo Handlebars: Ergonomically shaped bars that have a flattened top section, designed to improve comfort and support for the rider’s hands during longer rides.
- Aero Handlebars: Flat, aerodynamic tops that reduce drag, making them ideal for road racing and time trials where reducing wind resistance is crucial.
- Round Handlebars: Traditional round-shaped bars that offer a simple and comfortable grip, suitable for versatile use across different types of cycling, including casual and urban rides.
Bike handlebars sorted by bar clamp diameter
Bike handlebars are sorted by bar clamp diameter, including 22.2mm, 25mm, 25.4mm, 26mm, 31.8mm, and 35mm. These diameters represent the thickness of the handlebar where it clamps to the stem, which affects compatibility, stiffness, and the overall strength of the handlebar.
- 22.2mm Clamp Diameter: Commonly found on BMX bikes and older mountain bikes, this diameter offers a simple and lightweight solution for less aggressive riding.
- 25mm Clamp Diameter: Typically seen on some vintage bikes, providing a standard lightweight option for older road and commuter models.
- 25.4mm Clamp Diameter: Used on many commuters and older mountain bikes, this diameter offers compatibility with classic stems and enough strength for moderate riding.
- 26mm Clamp Diameter: Found mainly on older road bikes, providing a balance between comfort and compatibility for traditional stem systems.
- 31.8mm Clamp Diameter: The current standard for modern road, gravel, and mountain bikes, this diameter increases stiffness and control while reducing flex during aggressive riding.
- 35mm Clamp Diameter: Seen on high-end mountain bikes, especially downhill and enduro models, this oversized diameter provides maximum stiffness and durability for extreme conditions.
What are bike handlebars made of?
Bike handlebars are made of materials such as aluminum, carbon fiber, titanium, steel, and scandium. These materials are chosen based on their unique properties like weight, stiffness, durability, and cost. Aluminum is popular for its balance of weight and affordability, carbon fiber is favored for its lightweight and vibration-damping properties, titanium offers excellent strength and a smooth ride feel, steel provides durability and resilience, and scandium is sometimes used for its lightweight properties while retaining some of the stiffness of aluminum. Each material is selected to optimize a handlebar’s performance, handling characteristics, and comfort based on the type of cycling and rider preferences.
Aluminum bike handlebar
Aluminum bike handlebar is used because it offers a balance of lightweight, stiffness, and affordability, making it ideal for a wide range of cycling disciplines. The material’s high tensile strength provides a good balance between comfort and control, and its relatively low weight improves handling responsiveness without adding excessive cost. Aluminum handlebars are great for road, gravel, and mountain bikes where riders need a stiff yet manageable handlebar to maintain precise control.
Carbon bike handlebar
Carbon bike handlebar is favored for excellent weight-to-strength ratio and vibration-damping properties, which enhance ride comfort, particularly on long-distance rides or rough terrain. Carbon fiber handlebars absorb road buzz effectively, reducing fatigue and allowing the rider to stay comfortable longer. These handlebars are lightweight, making them ideal for competitive cycling where reducing overall bike weight is crucial for performance, and their stiffness provides precise handling for high-speed riding.
Titanium bike handlebar
Titanium bike handlebar is chosen for its combination of strength, flexibility, and lightweight properties, which makes it ideal for providing a comfortable ride over long distances. Titanium has excellent tensile strength and fatigue resistance, which results in a smooth ride feel by absorbing small vibrations while retaining enough stiffness for responsive handling. Titanium handlebars are more costly compared to aluminum or carbon but are well-suited for riders who value comfort and durability, especially for touring and endurance cycling.
Steel bike handlebar
Steel bike handlebar is used because of its durability and excellent strength, making it an ideal choice for heavy-duty use and riders who need reliability over performance weight. Steel’s high tensile strength allows it to absorb shock well, providing a smooth ride that is comfortable on rough terrain. Although heavier than other materials, steel handlebars are often used for touring and commuter bikes where durability and comfort are prioritized over weight savings.
Scandium bike handlebar
Scandium bike handlebar is used for its lightweight and similar stiffness to aluminum, making it a good option for performance-focused riding where weight reduction is important. Scandium allows handlebars to be thinner while maintaining strength, resulting in a reduced overall weight and increased stiffness, which helps improve handling responsiveness. Scandium handlebars are generally more expensive, and they are popular in high-performance road and mountain biking where saving every gram matters.
Aluminum vs carbon fiber vs titanium vs steel vs scandium bike handlebar
When comparing aluminum, carbon fiber, titanium, steel, and scandium bike handlebars, it’s essential to consider features such as weight, strength, stiffness, tensile strength, yield strength, cost, and manufacturing difficulty. Each material offers unique benefits that suit different cycling needs—whether it’s the lightweight and affordability of aluminum, the vibration-damping properties of carbon fiber, the durability and ride comfort of titanium, the robustness of steel, or the specialized performance of scandium. Understanding these differences helps riders make an informed choice based on their cycling discipline, budget, and desired ride quality.
| Material | Weight | Strength (MPa) | Stiffness | Tensile Strength (MPa) | Yield Strength (MPa) | Cost (USD) | Manufacturing Difficulty |
| Aluminum | Light (200-300g) | 290-310 | Moderate | 300-350 | 200-250 | $50-$100 | Low |
| Carbon Fiber | Very Light (150-250g) | 500-800 | High | 500-600 | 400-450 | $150-$300 | High |
| Titanium | Medium (250-350g) | 800-900 | Moderate-High | 900-950 | 600-650 | $250-$500 | Very High |
| Steel | Heavy (350-500g) | 400-500 | High | 400-500 | 300-350 | $20-$50 | Low |
| Scandium | Light (180-280g) | 450-500 | High | 500-550 | 350-400 | $100-$200 | Moderate |

Bike handlebar dimension
Bike handlebar dimensions include diameter, width, height, and drop, which are crucial for optimizing fit, comfort, and control. The diameter determines compatibility with stems and affects handlebar stiffness, with common sizes including 25.4mm, 31.8mm, and 35mm. Width influences leverage and control; wider bars provide stability for mountain biking, while narrower bars reduce aerodynamic drag for road bikes. Height or rise is relevant for riser bars, adjusting the hand position for a more upright or aggressive stance. The drop refers to the distance between the top and the lower parts of drop bars, which impacts how low and aerodynamic the rider can get, important for road and track cycling. Each dimension affects handling, comfort, and the rider’s position, which in turn influences performance across different riding disciplines.
Bike handlebar diameter
Bike handlebar diameter refers to the thickness of the handlebar where it attaches to the stem, and it plays a significant role in cycling performance and handling. A larger diameter typically results in increased stiffness, which is beneficial for handling precision and reducing flex during aggressive riding. The most popular sizes are 25.4mm, 31.8mm, and 35mm, each chosen based on the type of cycling and the rider’s preference for stiffness and control.
| Bike Type | Popular Handlebar Diameter (mm) |
| Road Bike | 31.8 |
| Mountain Bike | 31.8, 35 |
| Gravel Bike | 31.8 |
| Commuter/Hybrid Bike | 25.4, 31.8 |
| BMX Bike | 22.2 |

Do all bikes have the same handlebar diameter?
No, because not all bikes have the same handlebar diameter. Different bike types require different handlebar diameters to achieve the desired stiffness, control, and compatibility with their specific stem and riding conditions. For example, road bikes commonly use 31.8mm diameter handlebars for a balance between stiffness and weight, while BMX bikes often use 22.2mm for ease of handling and tricks.
Bike handlebar width
Bike handlebar width is an important factor that affects a rider’s control, stability, and comfort. The width of the handlebar is typically chosen based on the type of bike and the intended use. A wider handlebar provides more leverage, better stability, and control, which is especially beneficial for technical terrains like mountain biking. On the other hand, a narrower handlebar is more aerodynamic and suitable for road cycling, as it reduces wind resistance. The correct handlebar width also depends on the rider’s shoulder width and riding preferences.
| Bike Type | Popular Handlebar Width (cm) |
| Mountain Bike | 70 – 80 cm |
| Road Bike | 38 – 44 cm |
| Fat Bike | 75 – 82 cm |
| Gravel Bike | 42 – 48 cm |
| City Bike | 55 – 65 cm |

How to measure bike handlebar width?
To measure bike handlebar width, you need to measure from end to end, considering the type of handlebar, the style, and the intended riding use to ensure comfort and performance. Measuring the handlebar width accurately ensures optimal handling, comfort, and suitability for the intended cycling discipline.
- Handlebar End-to-End Measurement: To measure handlebar width, measure the distance between the outermost ends of the handlebars. This provides the actual width in centimeters or millimeters.
- Type of Handlebar: Different handlebar types, such as flat bars or drop bars, may have varying measurements depending on where you place the tape, so be consistent.
- Rider’s Shoulder Width: Compare the handlebar width to your shoulder width to ensure an ergonomic fit that allows for comfortable and stable riding.
- Riding Style: Determine whether you need a wider or narrower handlebar based on your riding style—mountain biking typically needs wider bars, while road biking often benefits from narrower ones.
How to choose road bike handlebar width?
To choose the correct road bike handlebar width, consider your shoulder width as the main reference point, as the handlebars should ideally align with your shoulder joints for optimal comfort and control. Proper bike fitting is essential to ensure an ergonomic position that minimizes fatigue; narrower handlebars are generally used for improved aerodynamics and efficiency in racing, while slightly wider bars can offer greater stability and control, which is preferable for endurance or more relaxed riding.
What is the average bike handlebar width?
The average bike handlebar width varies by bike type: road bike handlebars typically range from 38 to 44 cm, mountain bike handlebars range from 70 to 80 cm, and city or commuter bike handlebars fall between 55 to 65 cm. These widths are chosen based on the specific needs of each cycling discipline—road bike bars are narrower to enhance aerodynamics and reduce drag, mountain bike bars are wider for increased stability and leverage on technical terrain, and city bike handlebars strike a balance between comfort and maneuverability for urban environments.
Bike handlebar height
Bike handlebar height, also known as handlebar rise or stack height, is the vertical distance between the top of the handlebar and the bottom bracket of the bike. The handlebar height directly impacts the rider’s position, comfort, and control. On road bikes, a lower handlebar height offers a more aerodynamic position, allowing for greater speed at the cost of increased strain on the rider’s back and shoulders. On mountain bikes (MTB), a higher handlebar height provides an upright posture that is beneficial for balance, visibility, and control, especially when riding technical trails.
- Road Bike: The handlebar height is generally set between 0 to -5 cm below the saddle height to optimize aerodynamic performance, which is ideal for speed and efficiency.
- Mountain Bike (MTB): The handlebar height is usually set between 0 to +5 cm above or level with the saddle height, providing a more upright and stable posture that enhances comfort and control during off-road rides.
The appropriate handlebar height for each bike type depends on the intended riding style, rider flexibility, and the desired balance between comfort and performance.
Bike handlebar drop
Bike handlebar drop refers to the vertical distance between the top section of the handlebar and the lowest point of the drop section, mainly applicable to road bike handlebars. This drop distance is crucial for providing multiple hand positions, improving aerodynamics, and affecting rider comfort. The deeper the drop, the lower the rider can get, enhancing aerodynamics but potentially reducing comfort, especially on long rides.
For road bikes, the handlebar drop typically ranges from 120mm to 150mm, allowing riders to adopt a more aggressive and aerodynamic riding position. Lower drops offer greater efficiency by reducing drag, but they require a flexible lower back and core strength to maintain comfort over extended periods.
For mountain bikes (MTB), there is generally no significant handlebar drop, as MTB handlebars are flat or riser bars that prioritize control and leverage over aerodynamic efficiency. Instead of a drop, mountain bike handlebars are designed to keep the rider in an upright position to maximize visibility, stability, and handling, which is essential for technical trails.
Bike handlebar Flare
Bike handlebar flare refers to the angle at which the drops of a handlebar splay outwards from the top section, often used in gravel and adventure biking. Flared handlebars provide additional control and stability by widening the drops, which improves leverage and handling, especially on uneven terrain. The flare angle makes it easier for the rider to maintain balance during technical sections, as well as improving comfort by allowing a more relaxed wrist angle when riding in the drops.
On gravel bikes, flare angles typically range from 10 to 25 degrees. The most popular sizes are around 12 to 16 degrees, as they strike a balance between added stability and maintaining a relatively aerodynamic profile. Flared handlebars are particularly advantageous on gravel or off-road conditions where riders may encounter loose surfaces and need additional stability and control.
How to choose bike handlebars?
To choose bike handlebars, consider factors like comfort, leverage, lift, cost, material, after-sale support, width, strength, weight, and flare, as each of these aspects plays an important role in your cycling experience and bike handling. These elements determine how well the handlebars suit your riding style, terrain, and preferences, ensuring the best balance of performance, control, and comfort.
- Comfort: Choose handlebars that offer the right shape and hand positions to minimize fatigue and strain, enhancing your overall riding comfort.
- Leverage: Consider handlebars that provide enough leverage for the type of riding you do—wider bars improve control for technical terrains, while narrower bars improve efficiency for road cycling.
- Lift: Handlebar rise affects your riding posture; choose a rise that offers either a more aggressive or upright position to match your cycling discipline.
- Cost: Set a budget and choose handlebars within that range, balancing between performance features and affordability.
- Material: Different materials (e.g., aluminum, carbon fiber) offer various benefits in terms of stiffness, weight, and vibration absorption, which affect handling and ride quality.
- After-sale Support: Check for warranties or replacement options, especially if investing in high-end handlebars, to ensure peace of mind in case of defects or issues.
- Width: Select a width that matches your shoulder width and riding style to enhance control, stability, and aerodynamics.
- Strength: Choose handlebars with adequate strength and durability for your riding style—mountain bikers need strong bars for technical trails, whereas road cyclists may prioritize weight.
- Weight: Lighter handlebars can improve the overall weight of your bike, making it easier to handle, especially on climbs, but ensure they still have the necessary strength.
- Flare: If you are riding on gravel or mixed terrain, consider a flared handlebar that offers improved stability and comfort in the drops for challenging surfaces.
What to consider when choosing a bike handlebar?
When choosing a bike handlebar, consider factors such as comfort, width, leverage, material, weight, rise, and flare, as each of these impacts how well the handlebar suits your riding style, terrain, control, and overall cycling performance, ensuring you have the best balance of comfort, handling, and efficiency.
How to set up your new bike handlebar?
To set up your new bike handlebar, start by loosening the bolts on the stem using an Allen wrench to adjust the handlebar’s angle and position. Place the handlebar at your preferred height and angle—typically, for road bikes, the drops should be aligned with the angle of your saddle, while for mountain bikes, the handlebar should provide an upright and comfortable position. Make sure to torque the stem bolts to the manufacturer’s specified torque value to avoid overtightening. Use a torque wrench to tighten the bolts evenly, paying attention to the correct handlebar alignment, and ensuring that the bar is centered in the stem. Finally, adjust the brake levers and shifters so they are comfortably reachable when your hands are on the hoods or grips, ensuring optimal control while riding.
How to attach the handlebar to the bike?
To attach the handlebar to the bike, start by using an Allen wrench to remove the faceplate from the stem. Place the handlebar in the stem’s clamp area, ensuring it is centered, then replace the faceplate. Use the Allen wrench to loosely reattach the faceplate screws, tightening them gradually and evenly in a cross pattern to avoid uneven pressure, which could damage the handlebar. Make sure the handlebar angle is comfortable before fully tightening the bolts. Use a torque wrench to tighten the bolts to the manufacturer’s recommended torque setting, ensuring proper security without overtightening, which is particularly important for carbon handlebars. Finally, verify that the handlebar is straight and properly aligned with the front wheel.
How tight should bike handlebar bolts be?
The bike handlebar bolts should typically be tightened to a torque of 5-8 Nm for aluminum handlebars and 4-6 Nm for carbon handlebars, depending on the manufacturer’s recommendations. Proper torque is crucial to ensure the handlebar is securely attached without risking damage—carbon bars are more susceptible to cracking if overtightened, whereas aluminum bars are more forgiving. The bolt material also plays a role; bolts are often made of stainless steel or titanium, and it’s essential to use a torque wrench to achieve the correct value to avoid stripping threads or damaging the handlebar.
Can you adjust the handlebar height on a road bike?
Yes, because on a road bike, you can adjust the handlebar height by moving spacers above or below the stem on a threadless headset or flipping the stem to adjust the rise. However the adjustment is limited by the length of the steerer tube, and if it has been cut too short, further adjustments may not be possible.
Can you adjust the handlebar height on a mountain bike?
Yes, because on a mountain bike, you can adjust the handlebar height by adding or removing spacers under the stem, using a riser handlebar, or using an adjustable stem. However the adjustment range is limited by the steerer tube length, and a significant change in height may affect the bike’s handling characteristics.
How to adjust the bike handlebar height?
To adjust the bike handlebar height, start by loosening the stem bolts with an Allen wrench until the stem can move freely on the steerer tube. If you have a threadless headset, adjust the height by either moving spacers below or above the stem to raise or lower the handlebar. Once the desired height is set, align the stem with the front wheel to ensure proper alignment. Use a torque wrench to tighten the stem bolts to the manufacturer’s recommended torque, typically around 5-8 Nm, making sure the stem is securely fastened without over-tightening. For quill stems, loosen the bolt on top of the stem, raise or lower the handlebar to the desired height, and then tighten the bolt back down, ensuring it is securely positioned. Always pay attention to the maximum height markings on the stem to avoid overextending and risking structural damage.
How to adjust the handlebar angle on a road bike?
To adjust the handlebar angle on a road bike, start by loosening the faceplate bolts on the stem using an Allen wrench. Once the bolts are loose enough to allow movement, rotate the handlebar to the desired angle, usually to make the brake hoods level with the saddle or slightly angled for comfort. Tighten the bolts evenly in a cross pattern using a torque wrench, applying the recommended torque (typically 5-8 Nm). Make sure to align the handlebar markings at the center for proper positioning.
How to adjust the handlebar height on a mountain bike?
To adjust the handlebar height on a mountain bike, start by loosening the stem bolts and top cap bolts with an Allen wrench. Once the bolts are loose, either add or remove spacers below the stem to change the height. Retighten the top cap first, ensuring the headset preload is correct, then align the stem with the front wheel before tightening the stem bolts using a torque wrench (5-8 Nm). Always ensure that you do not exceed the steerer tube length.
How to adjust bike handlebar alignment?
To adjust the bike handlebar alignment, loosen the stem bolts using an Allen wrench so that the handlebar can move. Align the handlebar with the front wheel by looking down from above or standing in front of the bike. Once aligned, tighten the stem bolts evenly, using a torque wrench to ensure proper security, typically around 5-8 Nm, to prevent slippage while riding.
How to raise bike handlebar height?
To raise the bike handlebar height, start by loosening the stem bolts on a threadless headset system and the top cap using an Allen wrench. Add spacers below the stem if available, or rotate the stem to adjust its rise angle. Retighten the top cap first to adjust the preload on the headset, then tighten the stem bolts using a torque wrench, ensuring alignment with the front wheel. For a quill stem, loosen the top bolt, raise the stem to the desired height, and then retighten the bolt, paying attention not to exceed the minimum insertion mark.
How to raise the handlebar height on a mountain bike?
To raise the handlebar height on a mountain bike, loosen the stem bolts and the top cap using an Allen wrench. Either add spacers below the stem or use a riser handlebar to achieve a more upright position. After adjusting the height, retighten the top cap to set the correct headset preload, then secure the stem bolts to the steerer tube with a torque wrench (5-8 Nm), making sure the stem is aligned with the front wheel for proper control.
What is the bike handlebar Allen key size?
The bike handlebar Allen key size is typically 4mm, 5mm, or 6mm, depending on the stem bolts used to attach the handlebar. These sizes are common because they provide the appropriate balance of torque for securing the bolts without damaging the handlebar or stem, ensuring that the connection is secure while accommodating the varying types of bolts used by different manufacturers. The specific size required depends on the type and model of the stem.
How to fix a loose bike handlebar?
To fix a loose bike handlebar, start by using an Allen wrench to tighten the stem bolts that secure the handlebar to the stem. First, check the bolts on the stem faceplate and ensure they are evenly tightened, ideally using a torque wrench to apply the recommended torque (usually 5-8 Nm, depending on the stem). Make sure to tighten the bolts in a cross pattern to distribute pressure evenly. Pay close attention to the alignment of the handlebar with the front wheel to ensure it is straight before fully tightening. If the handlebar continues to be loose, check the bolts on the headset or stem clamp, and replace any worn or stripped bolts to avoid further issues.
How to change a bike handlebar?
To change a bike handlebar, begin by removing the bar tape (if applicable) and then detach any components, such as brake levers, shifters, and grips. Use an Allen wrench to loosen the faceplate bolts on the stem and remove the old handlebar. Position the new handlebar in the stem clamp, making sure it is centered and aligned properly. Reattach the stem faceplate, tightening the bolts evenly in a cross pattern to avoid over-tightening one side. Use a torque wrench to tighten to the specified torque (typically 5-8 Nm). Finally, reattach the components, such as brake levers, shifters, and grips, and rewrap the bar tape if necessary. Ensure that everything is securely fastened before riding.
Can a road bike have a straight handlebar?
Yes, because a road bike can have a straight handlebar if you prefer an upright riding position for better comfort and control, especially for commuting or casual riding. Straight handlebars provide easier handling and improved visibility compared to drop bars, but they may reduce the aerodynamic efficiency that is typically desired in road cycling. Installing a straight handlebar may also require changing the brake levers and shifters to compatible versions designed for flat bars.
How to convert a road bike to a flat handlebar?
To convert a road bike to a flat handlebar, start by gathering the necessary tools, including Allen wrenches, cable cutters, and a torque wrench. You will also need new flat handlebars, flat-bar compatible brake levers, shifters, new cables, grips, and potentially a new stem for proper fit.
- Remove the Old Handlebar: Use an Allen wrench to loosen the bolts on the stem faceplate and remove the drop handlebar. Remove bar tape, brake levers, and shifters beforehand.
- Install the Flat Handlebar: Place the new flat handlebar in the stem clamp and tighten the bolts evenly using an Allen wrench, ensuring it is centered. Use a torque wrench to tighten the bolts to the recommended torque (typically around 5-8 Nm).
- Replace Brake Levers and Shifters: Install flat-bar compatible brake levers and shifters onto the new handlebar. Ensure they are properly positioned for comfortable reach, then tighten them securely.
- Replace Cables and Housing: Road bike shifter and brake cables for drop bars may not be suitable for flat handlebars due to length differences. Install new cables and housing, ensuring a smooth and correct path for both shifting and braking.
- Install Grips: Slide the grips onto each end of the handlebar, securing them with the appropriate method (e.g., using grip glue or tightening lock-on clamps).
- Adjust Brake and Gear Tuning: Test the brakes and shifting to ensure everything functions smoothly. You may need to adjust the cable tension and fine-tune the brakes and gears to ensure proper performance.
Can I convert it to a TT bike with a straight handlebar?
Yes, because you can convert a road bike to a TT (time trial) bike with a straight handlebar by installing clip-on aero bars that provide an aerodynamic position. However, it may not be as effective as using drop bars or dedicated TT bars since straight handlebars lack the multiple-hand positions and aerodynamic benefits of a typical TT setup.
Can I put a BMX handlebar on a mountain bike?
Yes, because you can put a BMX handlebar on a mountain bike if the handlebar diameter matches the stem, allowing for a secure fit. However, it may affect handling due to differences in rise, width, and intended use, which could make the bike less suited for rough terrains typically found in mountain biking.
How to do Integrated cockpit road bike maintenance?
To perform integrated cockpit maintenance on a road bike, start by gathering the necessary tools, including Allen wrenches, a torque wrench, cleaning cloths, a degreaser, and bike-specific grease. Follow these steps for effective maintenance:
- Inspect the Cockpit: Begin by visually inspecting the integrated handlebar and stem for any cracks, damage, or unusual wear. Pay close attention to high-stress areas where the handlebar connects to the stem and where the stem connects to the steerer tube.
- Check Bolt Tightness: Use an Allen wrench and a torque wrench to ensure all bolts on the integrated cockpit (including the stem bolts and faceplate bolts) are tightened to the manufacturer’s recommended torque, typically between 5-8 Nm. Improperly tightened bolts can lead to failure or handlebar slippage while overtightening can damage carbon components.
- Clean and Lubricate: Wipe down the integrated cockpit using a soft cloth and a mild bike cleaner. Make sure to clean out any dirt or debris around the headset and where the cables run. Apply bike-specific grease or carbon assembly paste to the bolt threads and contact points to prevent creaking and improve longevity, especially in carbon parts.
- Cable Management: Check the internal cable routing to ensure there are no kinks, excess tension, or wear on the cables. If cables are worn, replace them with new ones. If the cables run through the handlebars, carefully remove the handlebar covers to inspect the cable condition and make any necessary adjustments.
- Headset Maintenance: If the integrated cockpit includes an integrated headset, ensure it is functioning smoothly without any play or tightness. Loosen the stem bolts, adjust the top cap to set the proper headset preload, and retighten the stem bolts, making sure to follow torque recommendations.
- Check Handlebar Alignment: Verify that the integrated handlebar is correctly aligned with the front wheel. Any misalignment can affect control and comfort while riding.
Bike handlebar accessories
Bike handlebar accessories are add-ons that are mounted onto the handlebars to enhance functionality, comfort, and convenience during cycling. They are used for various purposes, such as improving safety, providing better navigation, or adding storage options. Common bike handlebar accessories include lights for visibility during low-light conditions, bike computers for tracking speed and distance, bell or horn for safety and communication, handlebar bags for extra storage, mirrors to enhance rearview visibility, phone mounts for easy access to navigation, and bar ends to provide extra hand positions for comfort. These accessories help cyclists customize their setup according to their specific riding style and needs, making rides safer, more comfortable, and more efficient.
Bike handlebar extender
Bike handlebar extenders are additional bars mounted onto the existing handlebars to increase the available space for mounting accessories such as lights, bike computers, GPS devices, or handlebar bags. By extending the mounting area, these extenders help keep the cockpit organized and free of clutter, allowing cyclists to easily access multiple devices without compromising comfort or control. Handlebar extenders are particularly useful for long-distance riders and bikepacking who need additional gear during rides, ensuring efficient use of space while maintaining an ergonomic setup.
Bike handlebar mount
Bike handlebar mounts are devices designed to securely attach items such as phones, cameras, cups, or baskets to the handlebars for easy access and convenience while riding. These mounts allow cyclists to keep essential items in view or within reach—like using a phone for navigation, a camera for action recording, a cup for hydration, or a basket for carrying small items—enhancing both the practicality and the overall cycling experience. With adjustable brackets and secure clamps, handlebar mounts ensure that items stay stable even on bumpy rides, making them particularly useful for commuters, bikepacking, and cyclists who value convenience and utility.
Bike handlebar spacers
Bike handlebar spacers are small rings placed between the stem and the headset on the steerer tube, used to adjust the handlebar height to achieve the desired riding position. By adding or removing spacers, cyclists can raise or lower the handlebars, thus modifying the bike’s geometry for comfort or performance. Spacers are typically made from lightweight materials such as aluminum, carbon fiber, or plastic, and they allow for fine-tuning of handlebar height without needing to replace or cut the steerer tube, making them crucial for maintaining proper fit and ensuring comfort during different types of rides.
Bike handlebar headset
Bike handlebar headsets are the components that connect the fork to the frame and allow the handlebars to rotate smoothly, enabling effective steering control. The headset is composed of bearings housed in cups that are pressed into the head tube of the frame, facilitating a stable interface between the fork steerer tube and the bike frame. Headsets are crucial for maintaining smooth and responsive steering, and their quality directly impacts handling precision, making them essential for overall bike stability and performance, particularly on rough or technical terrain.
Bike handlebar brands and manufacturers
Bike handlebar brands and manufacturers have evolved over the years, beginning with simple steel bars and now incorporating advanced materials like carbon fiber and titanium to create handlebars optimized for different cycling disciplines. These bike brands strive to improve ride quality, comfort, and performance, catering to the needs of road cyclists, mountain bikers, commuters, and more. Many of these manufacturers have a rich history of innovation, constantly pushing the boundaries of strength, weight, and ergonomic design.
| Brand | Founded | Country/Region | Specialization |
| FSA (Full Speed Ahead) | 1993 | Italy | High-performance carbon and aluminum handlebars for road and mountain bikes |
| ENVE | 2007 | USA | Premium carbon fiber handlebars known for lightweight strength |
| Easton | 1922 | USA | Aluminum and carbon handlebars for both road and MTB |
| Zipp | 1988 | USA | Aerodynamic carbon handlebars for road and triathlon |
| Thomson | 1994 | USA | Aluminum handlebars with a focus on durability and reliability |
| Ritchey | 1974 | USA | Versatile handlebars for road, gravel, and MTB |
| Truvativ | 1989 | USA | Mountain bike handlebars, part of SRAM |
| Giant | 1972 | Taiwan, China | Affordable and performance-oriented handlebars for various bike types |
| Pro (Shimano) | 1980s | Japan | High-performance handlebars for road, gravel, and MTB, under Shimano |
| Renthal | 1969 | UK | High-strength handlebars for mountain biking and BMX |